Written by Sofia Gil-Clavel.
Source: This image was created with the assistance of DALL·E 3, in January 22, 2025.
Helping lab members to access hardware and software
The Societal Analytics Lab works together with the IT for Research department to help lab members access hardware and software. We aim to help VU researchers face three common issues related with computing power: 1) insufficient RAM, 2) insufficient storage memory, and 3) lack of GPUs.
Insufficient RAM
According to our last survey, researchers commonly report insufficient RAM as something that constraints their work. Many desktop and laptop computers are ill equipped to open and handle large data sets when using common statistical software. Researchers can run into trouble when their computers need to perform some computing that could increase the size of the data stored in RAM. You may recognize this error from those times when your R session ended with the message “R Session Aborted”. At VU, IT gives researchers access to two different computing servers that offer plenty of RAM memory: (a) JupyterHub (up to 260 GB), and (b) the High Performance Computer (up to 240 GB).
JupyterHub
According to IT:
“[JupyterHub allows] you to effortlessly work on your projects directly within your web browser. With a wide range of preconfigured environments to choose from, you can focus on your tasks instead of troubleshooting workspace issues.” https://hub.compute.vu.nl/.
JupyterHub provides users with up to 260 GB of RAM. VU IT provides three possible servers to use (Figure 2).
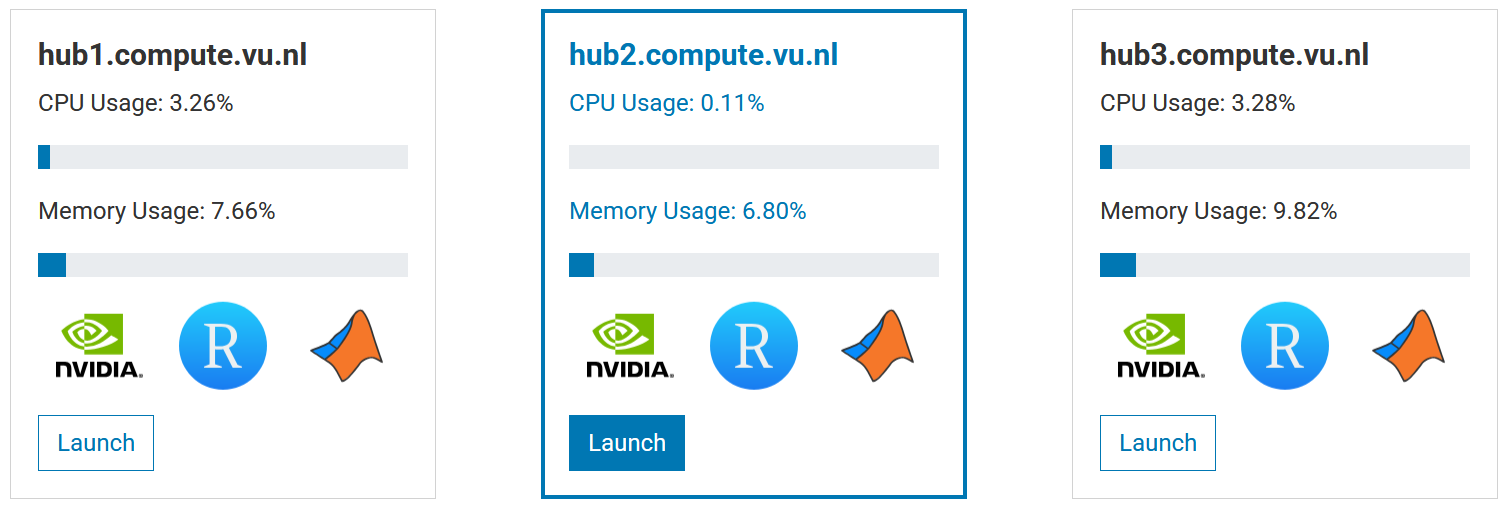
Figure 2: JupyterHub servers run by VU IT for Research. Screenshot from https://hub.compute.vu.nl/ taken on January 21st, 2025.
In the JupyterHub servers, there are already some popular environments running, such as Python, R/Rstudio, and MATLAB, as well as some environments used by students following a course (Figure 3). So, users just need to open and access one of the three running JupyterHub servers and start using their favorite software.
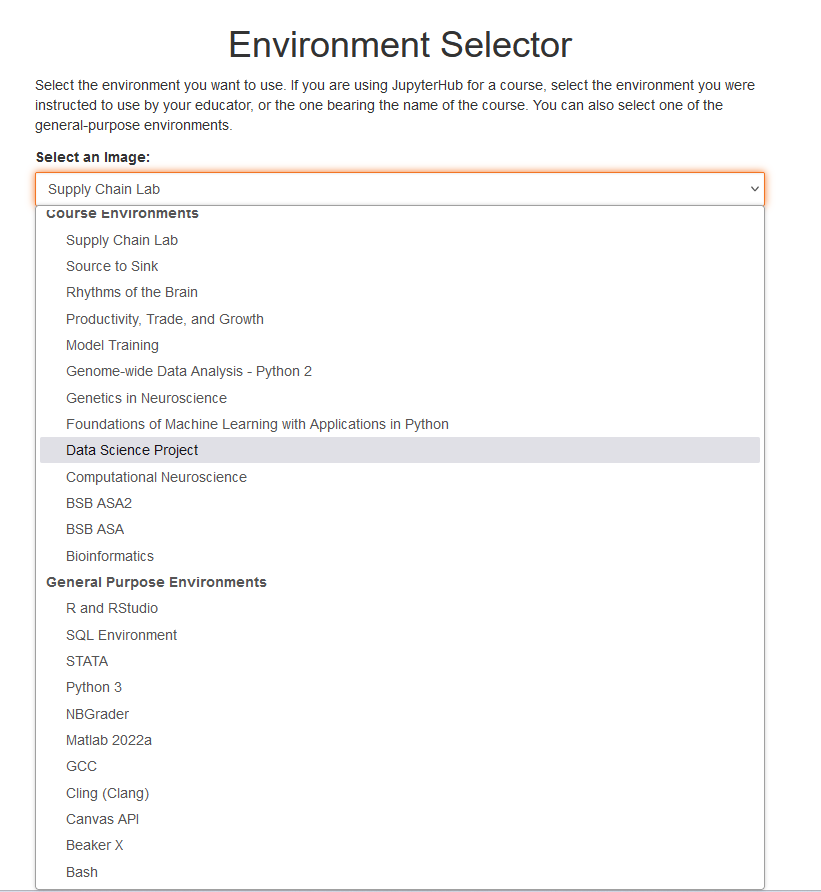
Figure 3: Selecting an environment in JupyterHub.
Once a server and environment are chosen then you can access specific software (Figure 4). Regardless of the environment, you will always have access to the Terminal. The Terminal is under the category “Other” (Figure 4). From the Terminal, it is possible to get more information about the server CPU by tipping the command lscpu in the terminal (Figure 5).
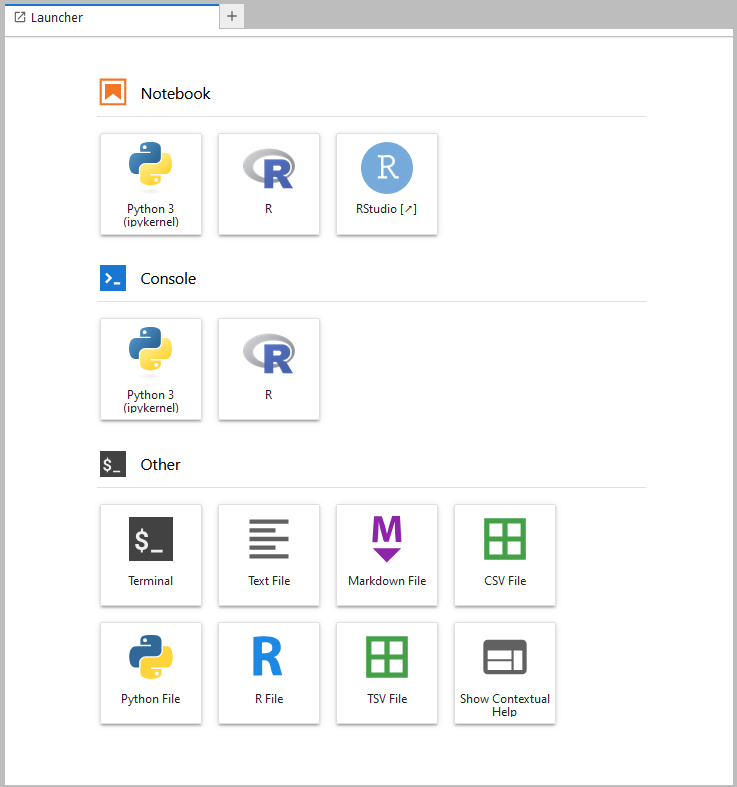
Figure 4: Accessing software based on the environment.
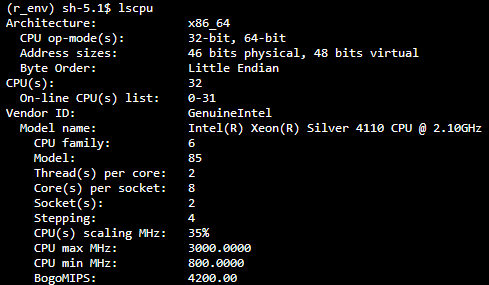
Figure 5: Example of the CPU information of the system.
High Performance Computer
If you need more memory and computing power, then you can use the VU High Performance Computer managed by BAZIS link. However, to use this computing server you need to know how to use the terminal and how to schedule your tasks using SSH files. If this is not the case, then you can contact us analytics-lab.fsw@vu.nl, we can help you. In terms of computing power, the High Performance Computer has 7 GPU nodes with 240GB RAM memory and 32 cores for general use. As VU employee, you can request access to the High Performance Computer here.
Insufficient storage memory
The second commonly faced problem is lack of storage memory. This problem is common among people aiming to store large data sets. Normally, desktops and laptops come with local memory ranging between 250 GB and 1 TB. This amount of memory is not large enough when the aim is to continuously download information from the Internet.
Just to give you an idea of how big this data can turn, let us check the case of Twitter data stored in the Internet Archive (link). In its good times, Twitter used to give access to a 1% sample of all the tweets generated in the platform via its public streaming Application Programming Interface. The Internet Archive hosts a repository that contains these samples collected every hour from 2011 to 2018. If you were to store one year of these tweets, you would need 1 TB of space!
One solution could be to store everything in external drivers, but this could make data handling slower, especially if using an older USB interface. So, the best solution is to get a bigger hard drive, but getting more than 2 TB for your personal computer may not be feasible. The other, and best, solution is to use a computing server that can provide you with the amount of memory you need. Lucky you, VU already offers this service for both aforementioned solutions: (a) JupyterHub, and (b) the High Performance Computer.
JupyterHub
By default, JupyterHub gives users only 3 GB of storage memory, but (according to IT) this can be increased (Figure 6).
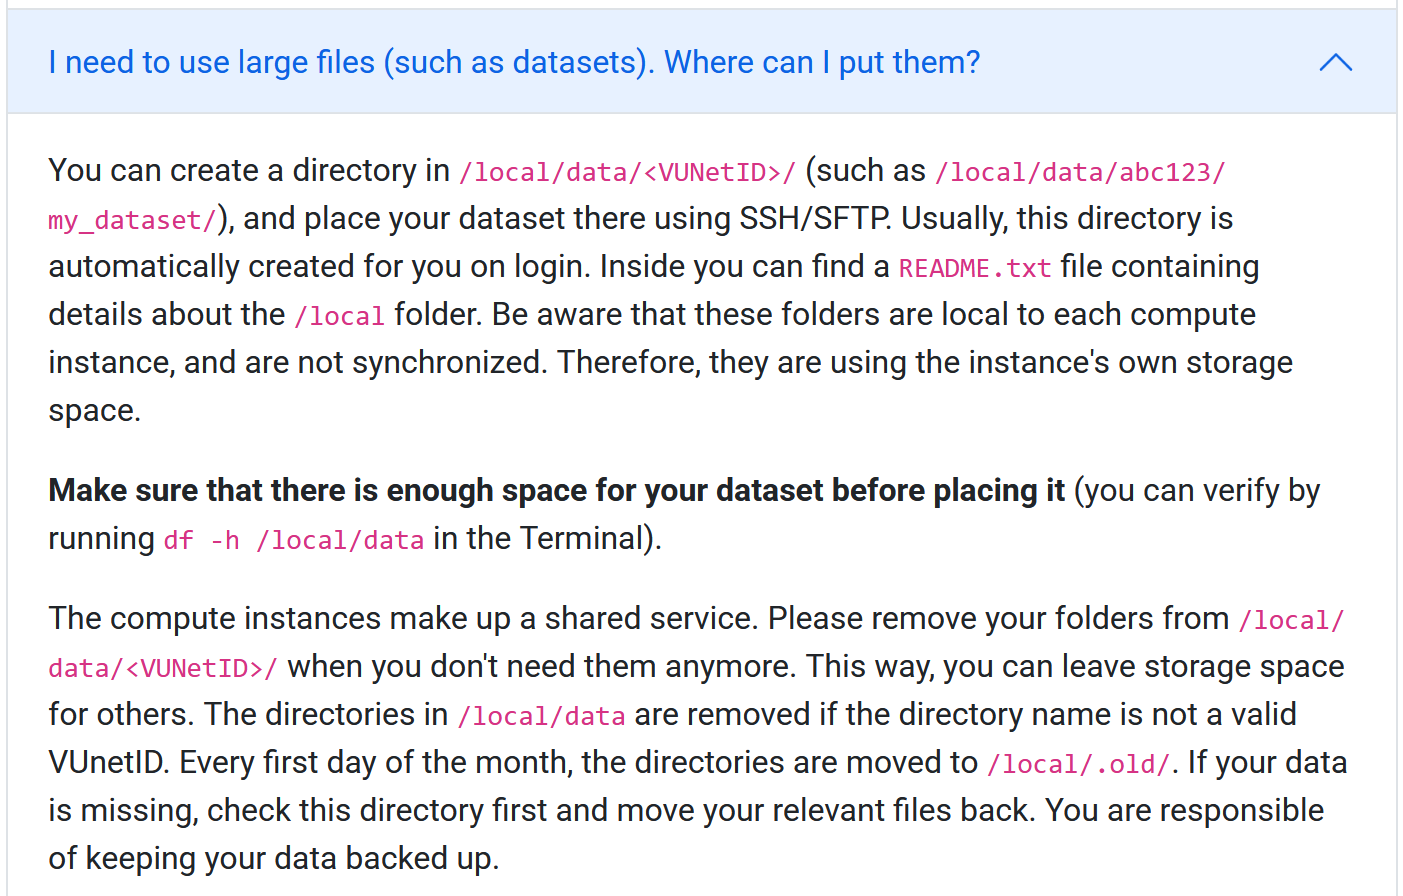
Figure 6: Screenshot of how to increase your JupyterHub memory. Screenshot taken on Jan. 21st, 2025, from https://hub.compute.vu.nl/.
If after reading IT’s instructions you have more questions than answers, please do not worry, we will translate Figure 6 for you. For this, let us turn IT instructions into steps:
a You can create a directory in local-data
Assuming you already opened one of the three servers and chose one of
the many available environments (Figure 2 and 3), then the first step is
to create the directory /local/data/<VUNetID>. For this, you need to
open the Terminal (Figure 4). Once in the Terminal, you need to type the
command: mkdir “/local/data/<VUNetID>”

You can verify that your folder exists by opening your favorite software and changing the working directory to the one storing the data. Figure 7 shows how to do it using Rstudio.

Figure 7: Checking data folder using Rstudio.
b Place your dataset there using SSH/SFTP
There are two types of data that you can store in there: data you derived, and external data. To store the data you derived from running your codes or analyses, you just need to change the home (working) directory as shown in Figure 7. To store external data, you need to follow the SSH File Transfer Protocol (SFTP) (a.k.a. SSH/SFTP). This means that we need to establish a secure connection between your local computer and the JupyterHub server. This can be done using your computer terminal or through a software (more info here).
SSH/SFTP via the terminal
IT for Research provides information on how to transfer the files via terminal in the JupyterHub webpage (Figure 8).
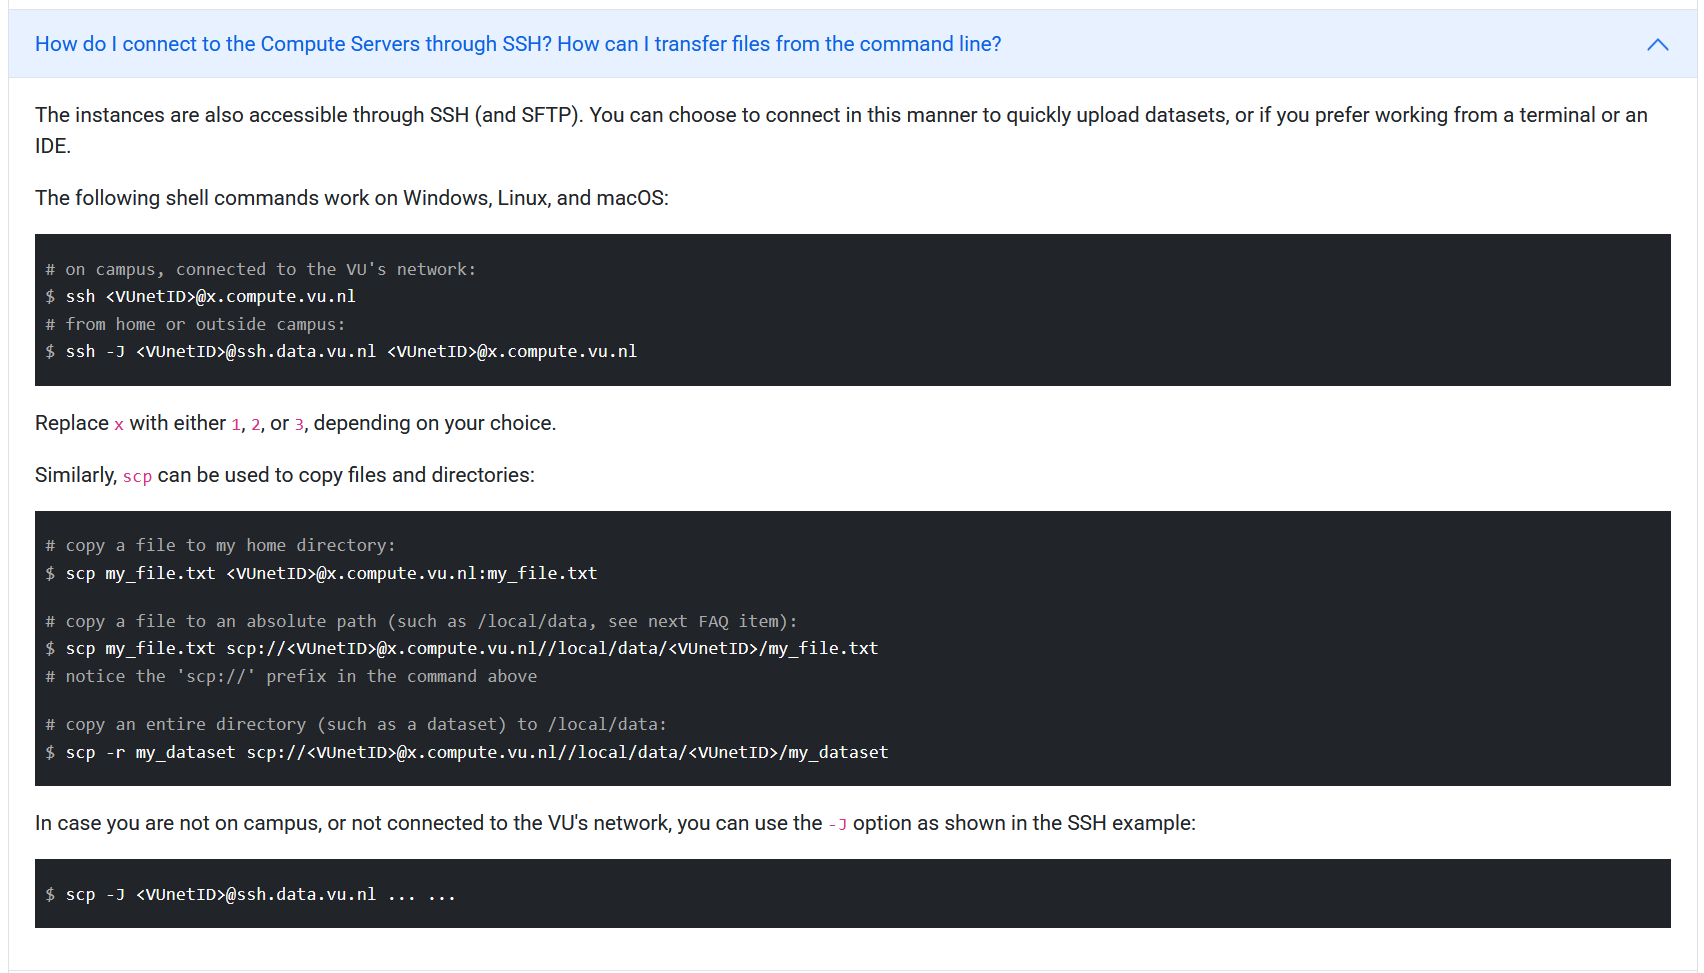
Figure 8: Screenshot of IT for research explanation on how to transfer files using the terminal. Source: https://hub.compute.vu.nl/, accessed on January 21st, 2025.
SSH/SFTP using a software
In this example, I will use the software WinSCP, and I will focus on Windows users. The implementation should also work for Mac users, otherwise, you can find some other alternatives here. To place the data using the software, we need to follow two steps: (i) create the connection between your computer and JupyterHub server, and (ii) upload the files.
(i) Create the connection between your computer and one of the JupyterHub servers
Open WinSCP, assuming you already downloaded and installed it.
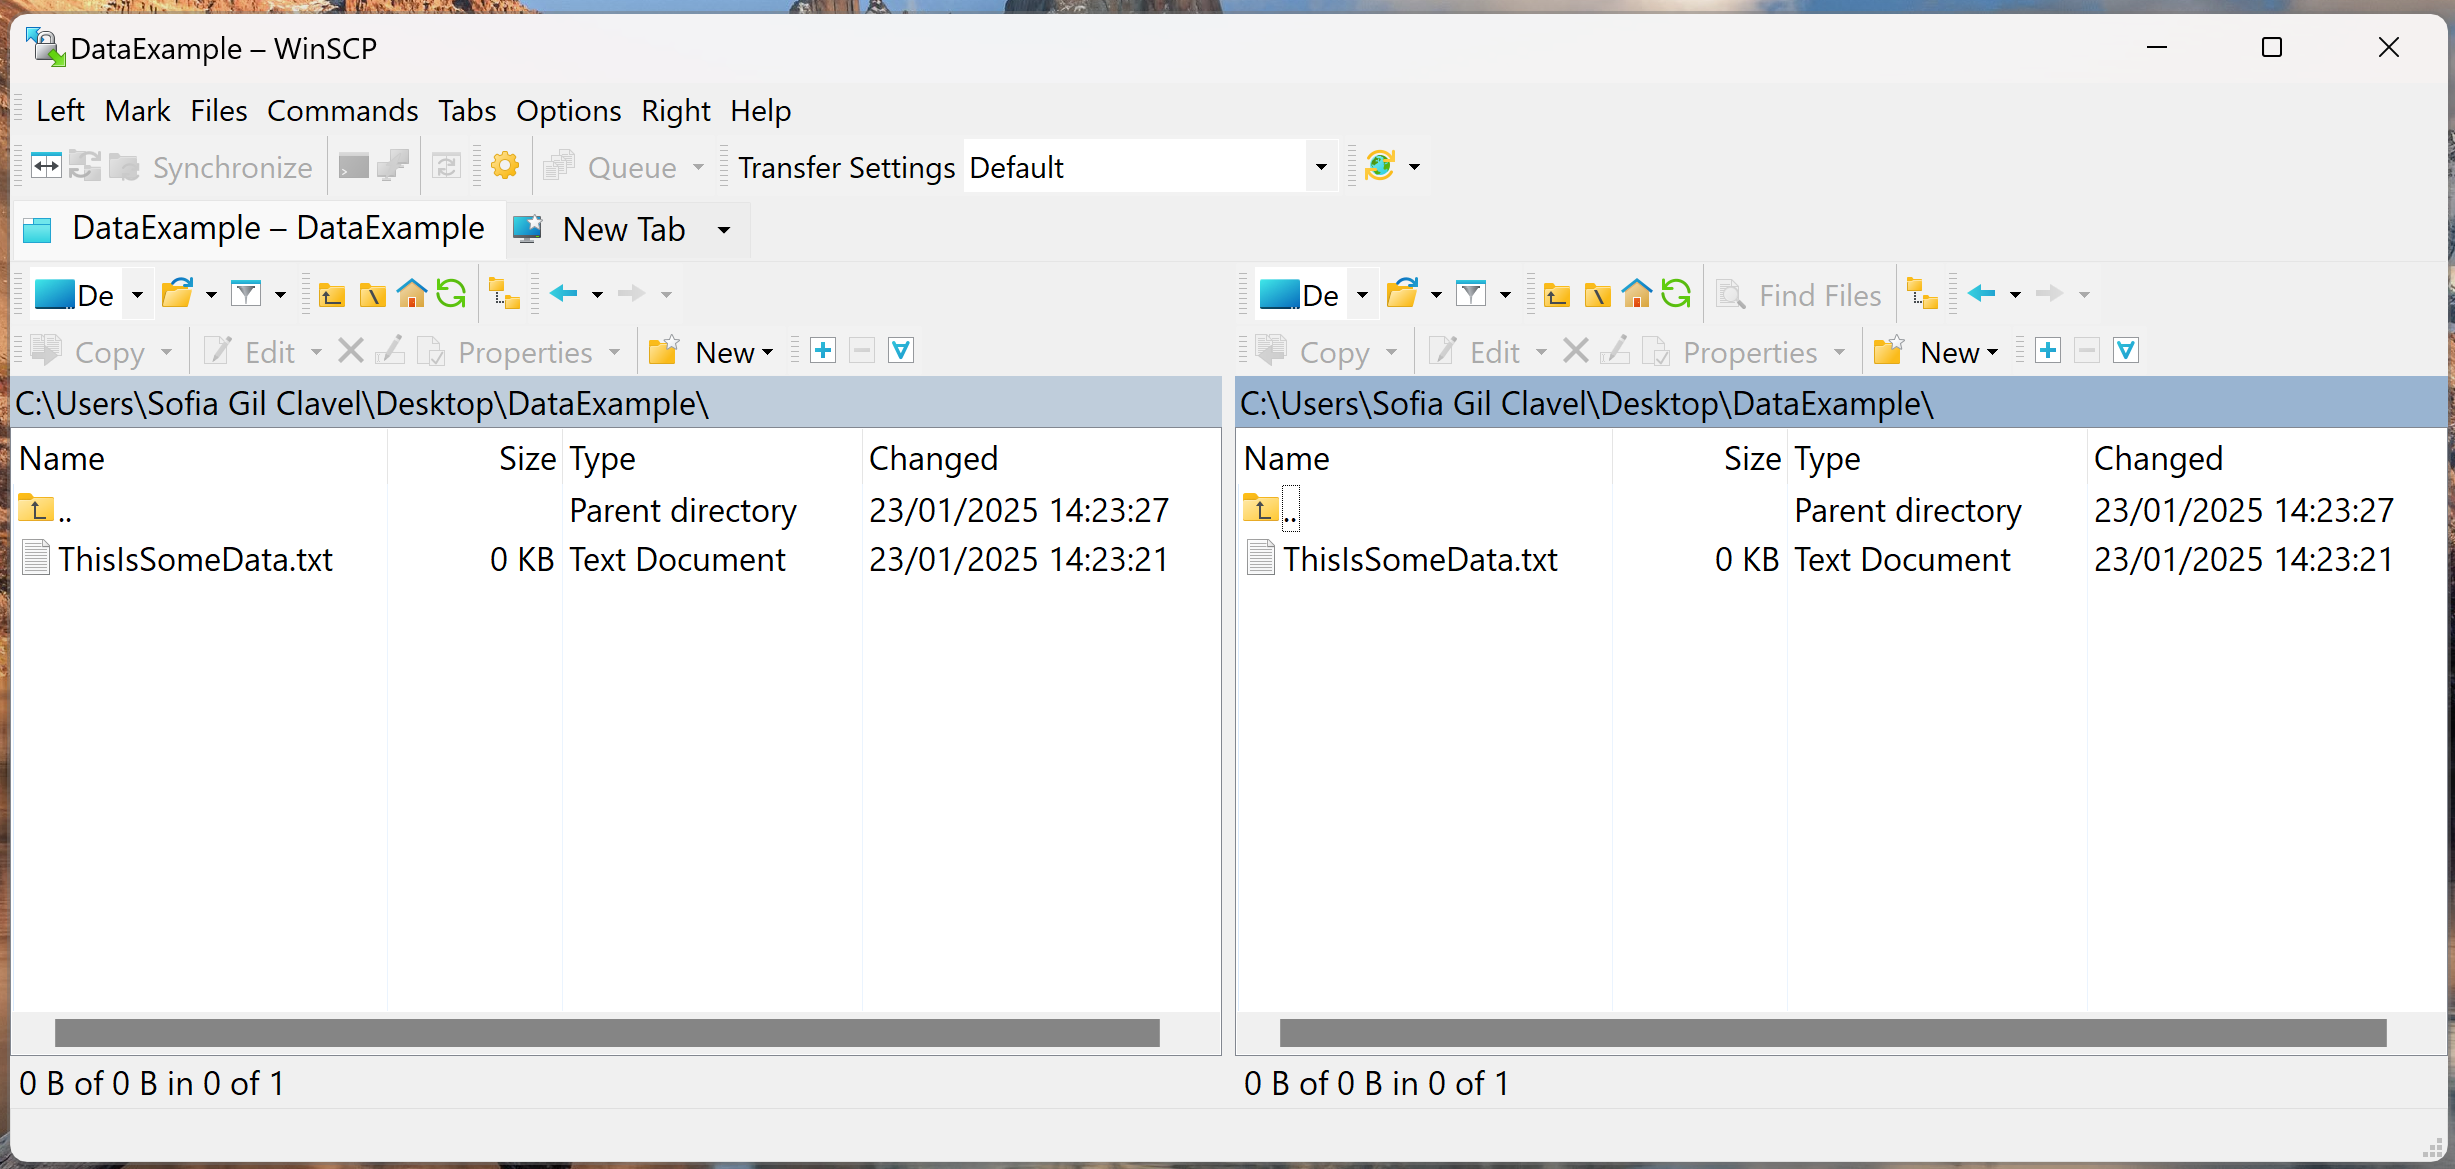
To establish a connection between your computer and JupyterHub server go to “Tabs/Sites/Site Manager…”.
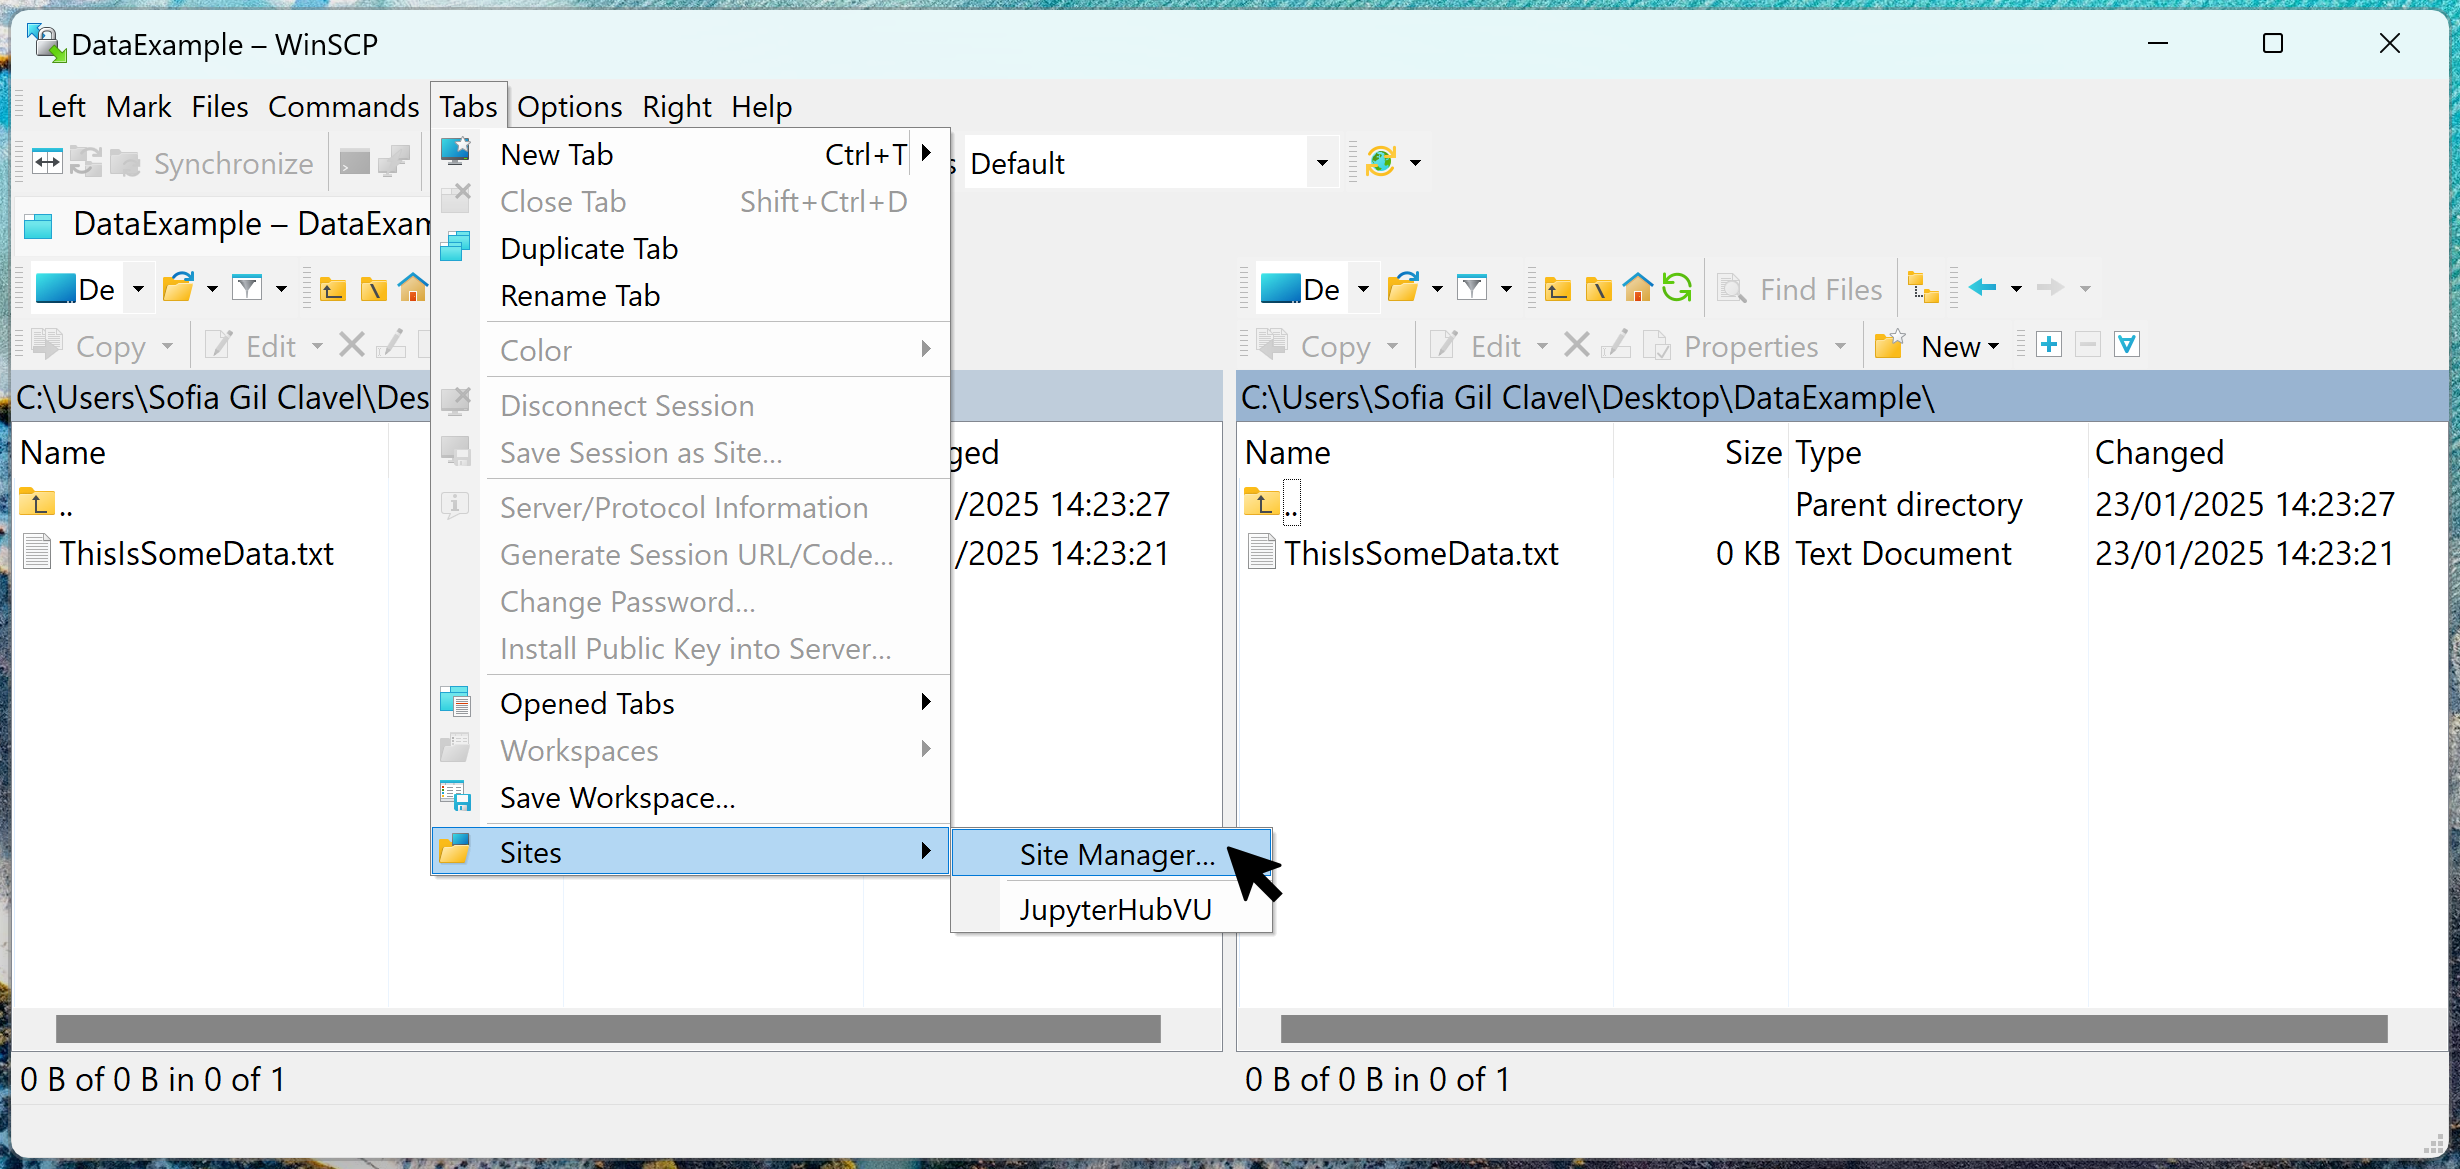
This will open the “Login” window.
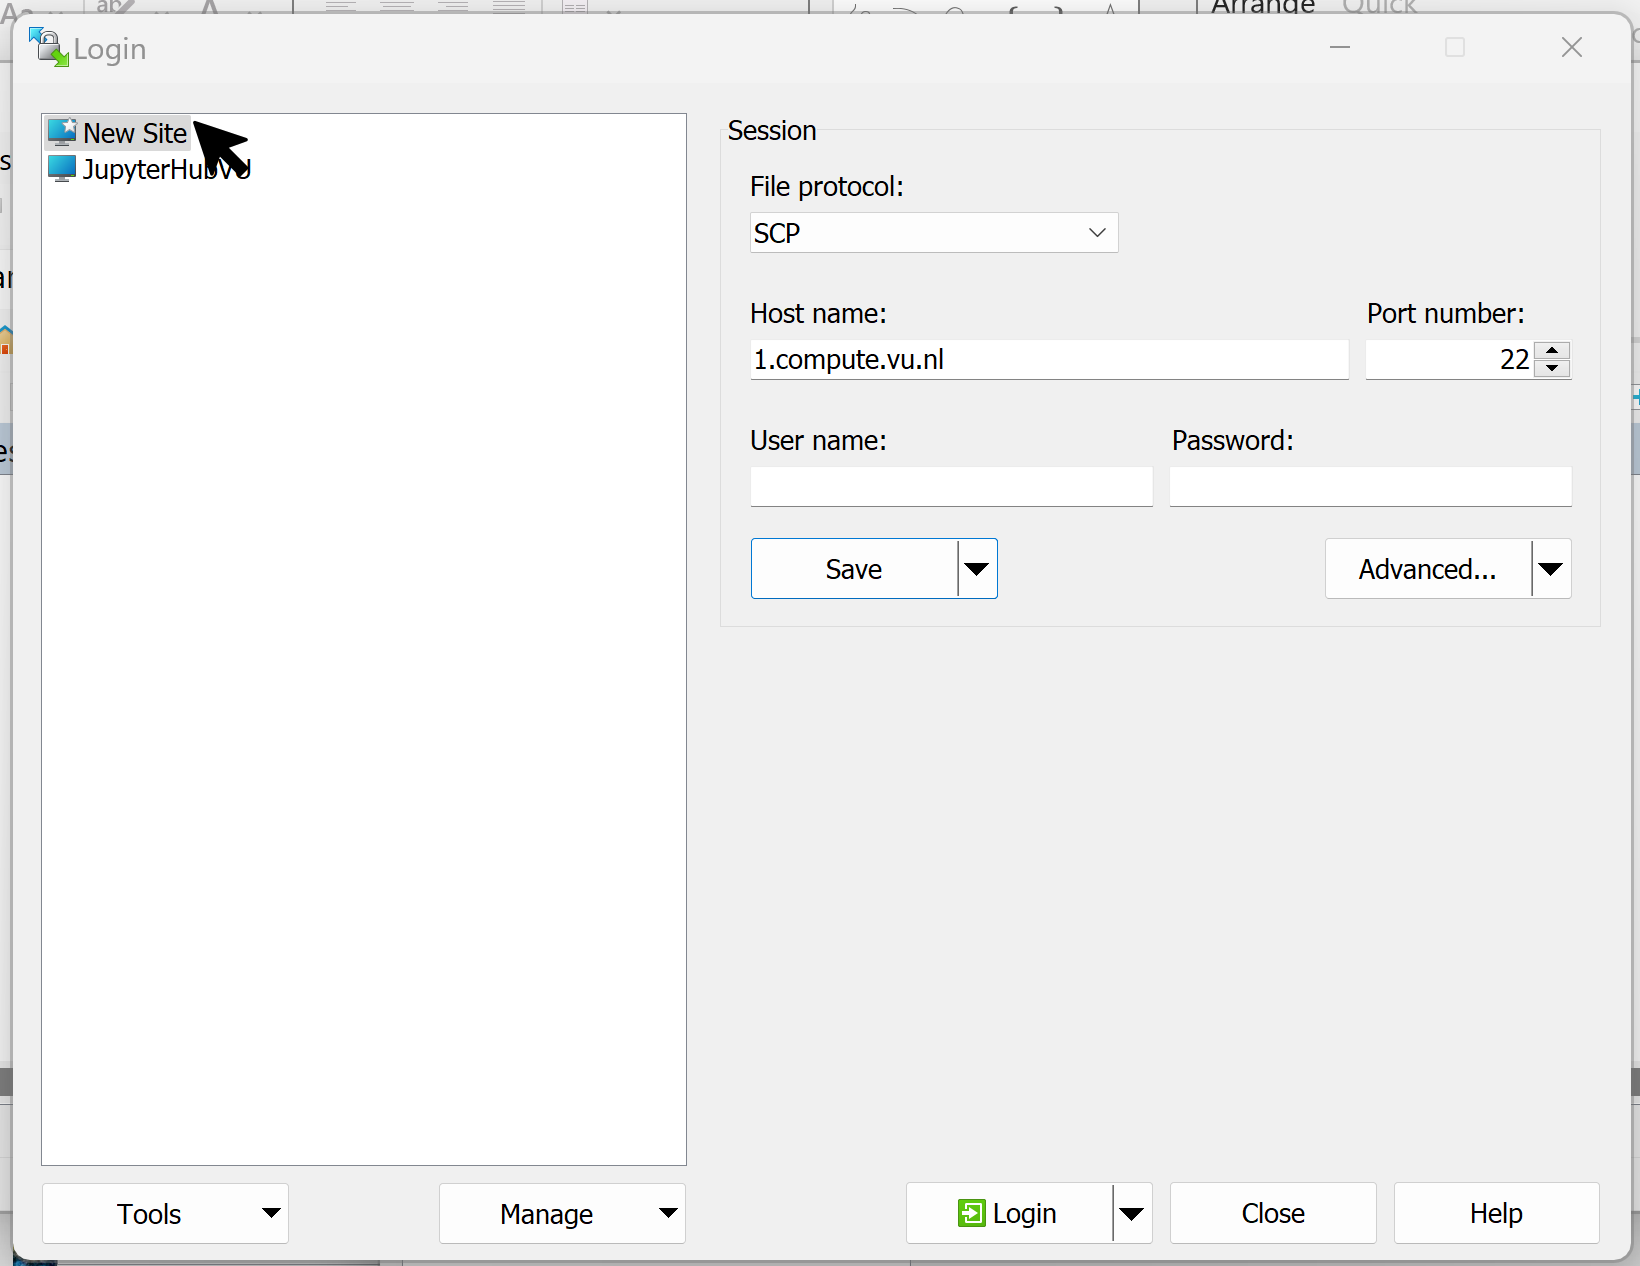
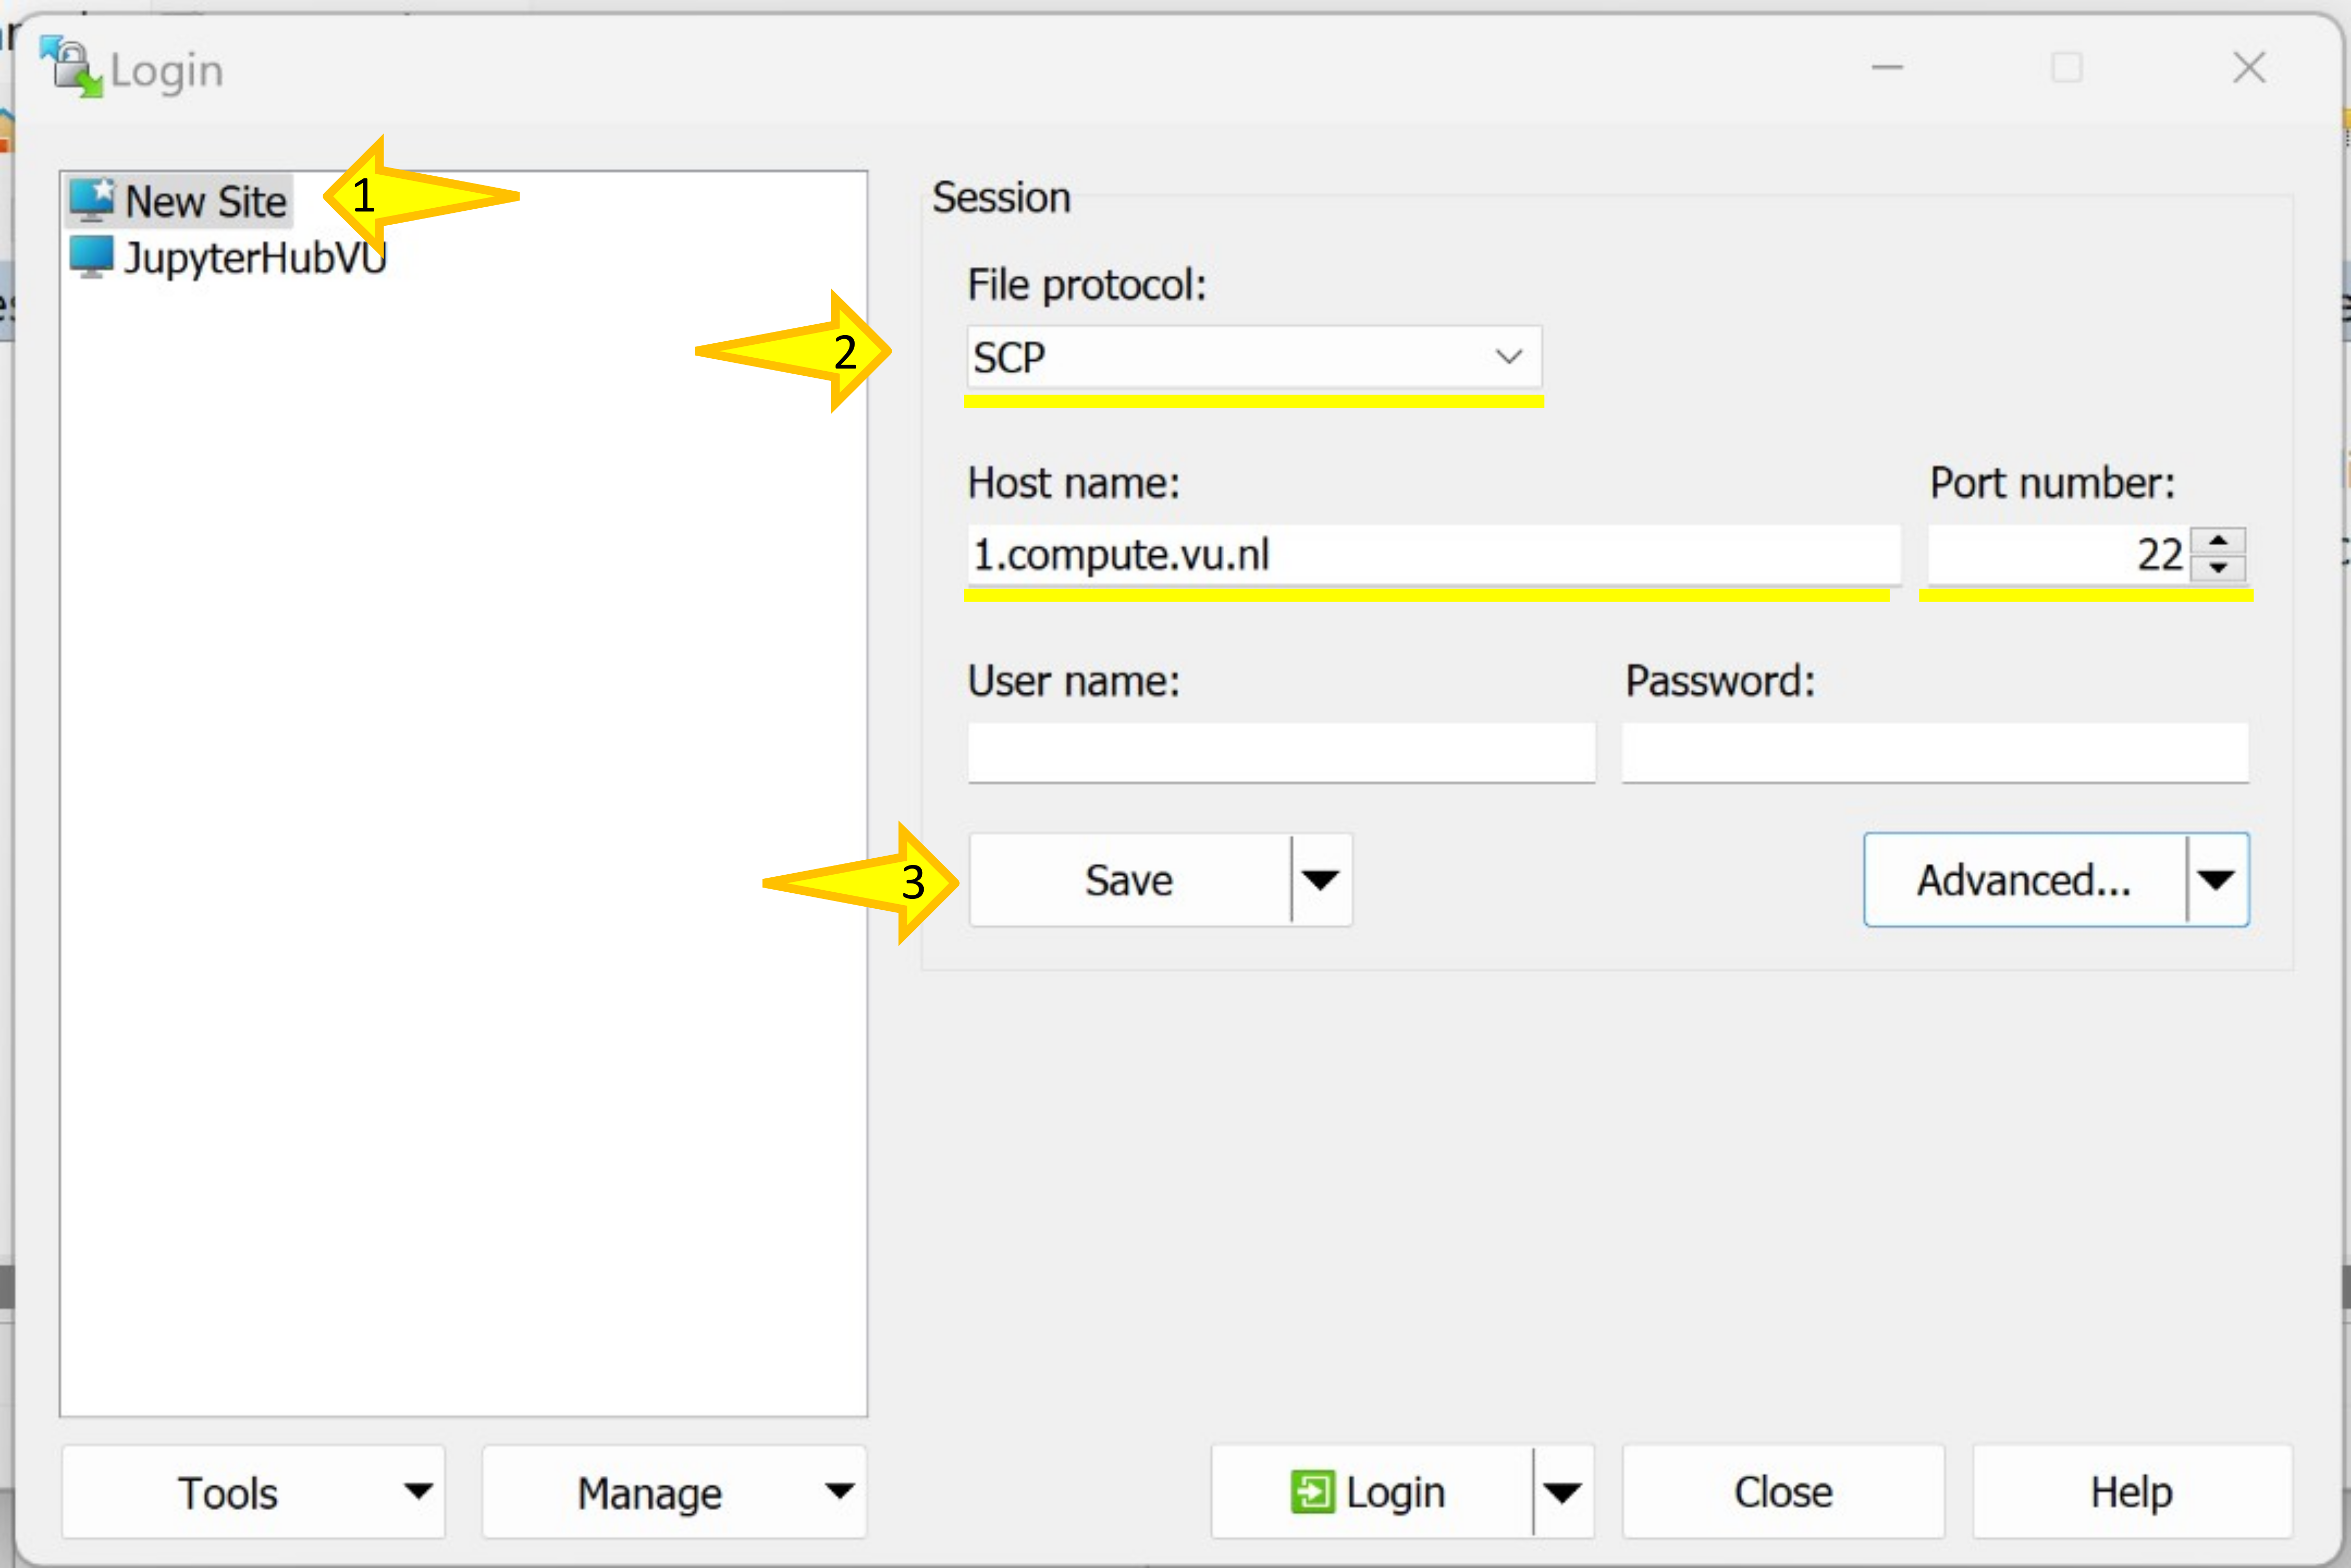
In the “Login” window, press “New Site” and add the information that IT provided. Remember that the number in the “Host name” can be replaced with either 1, 2, or 3, depending on the JupyterHub you are using. Then, press “Save”.
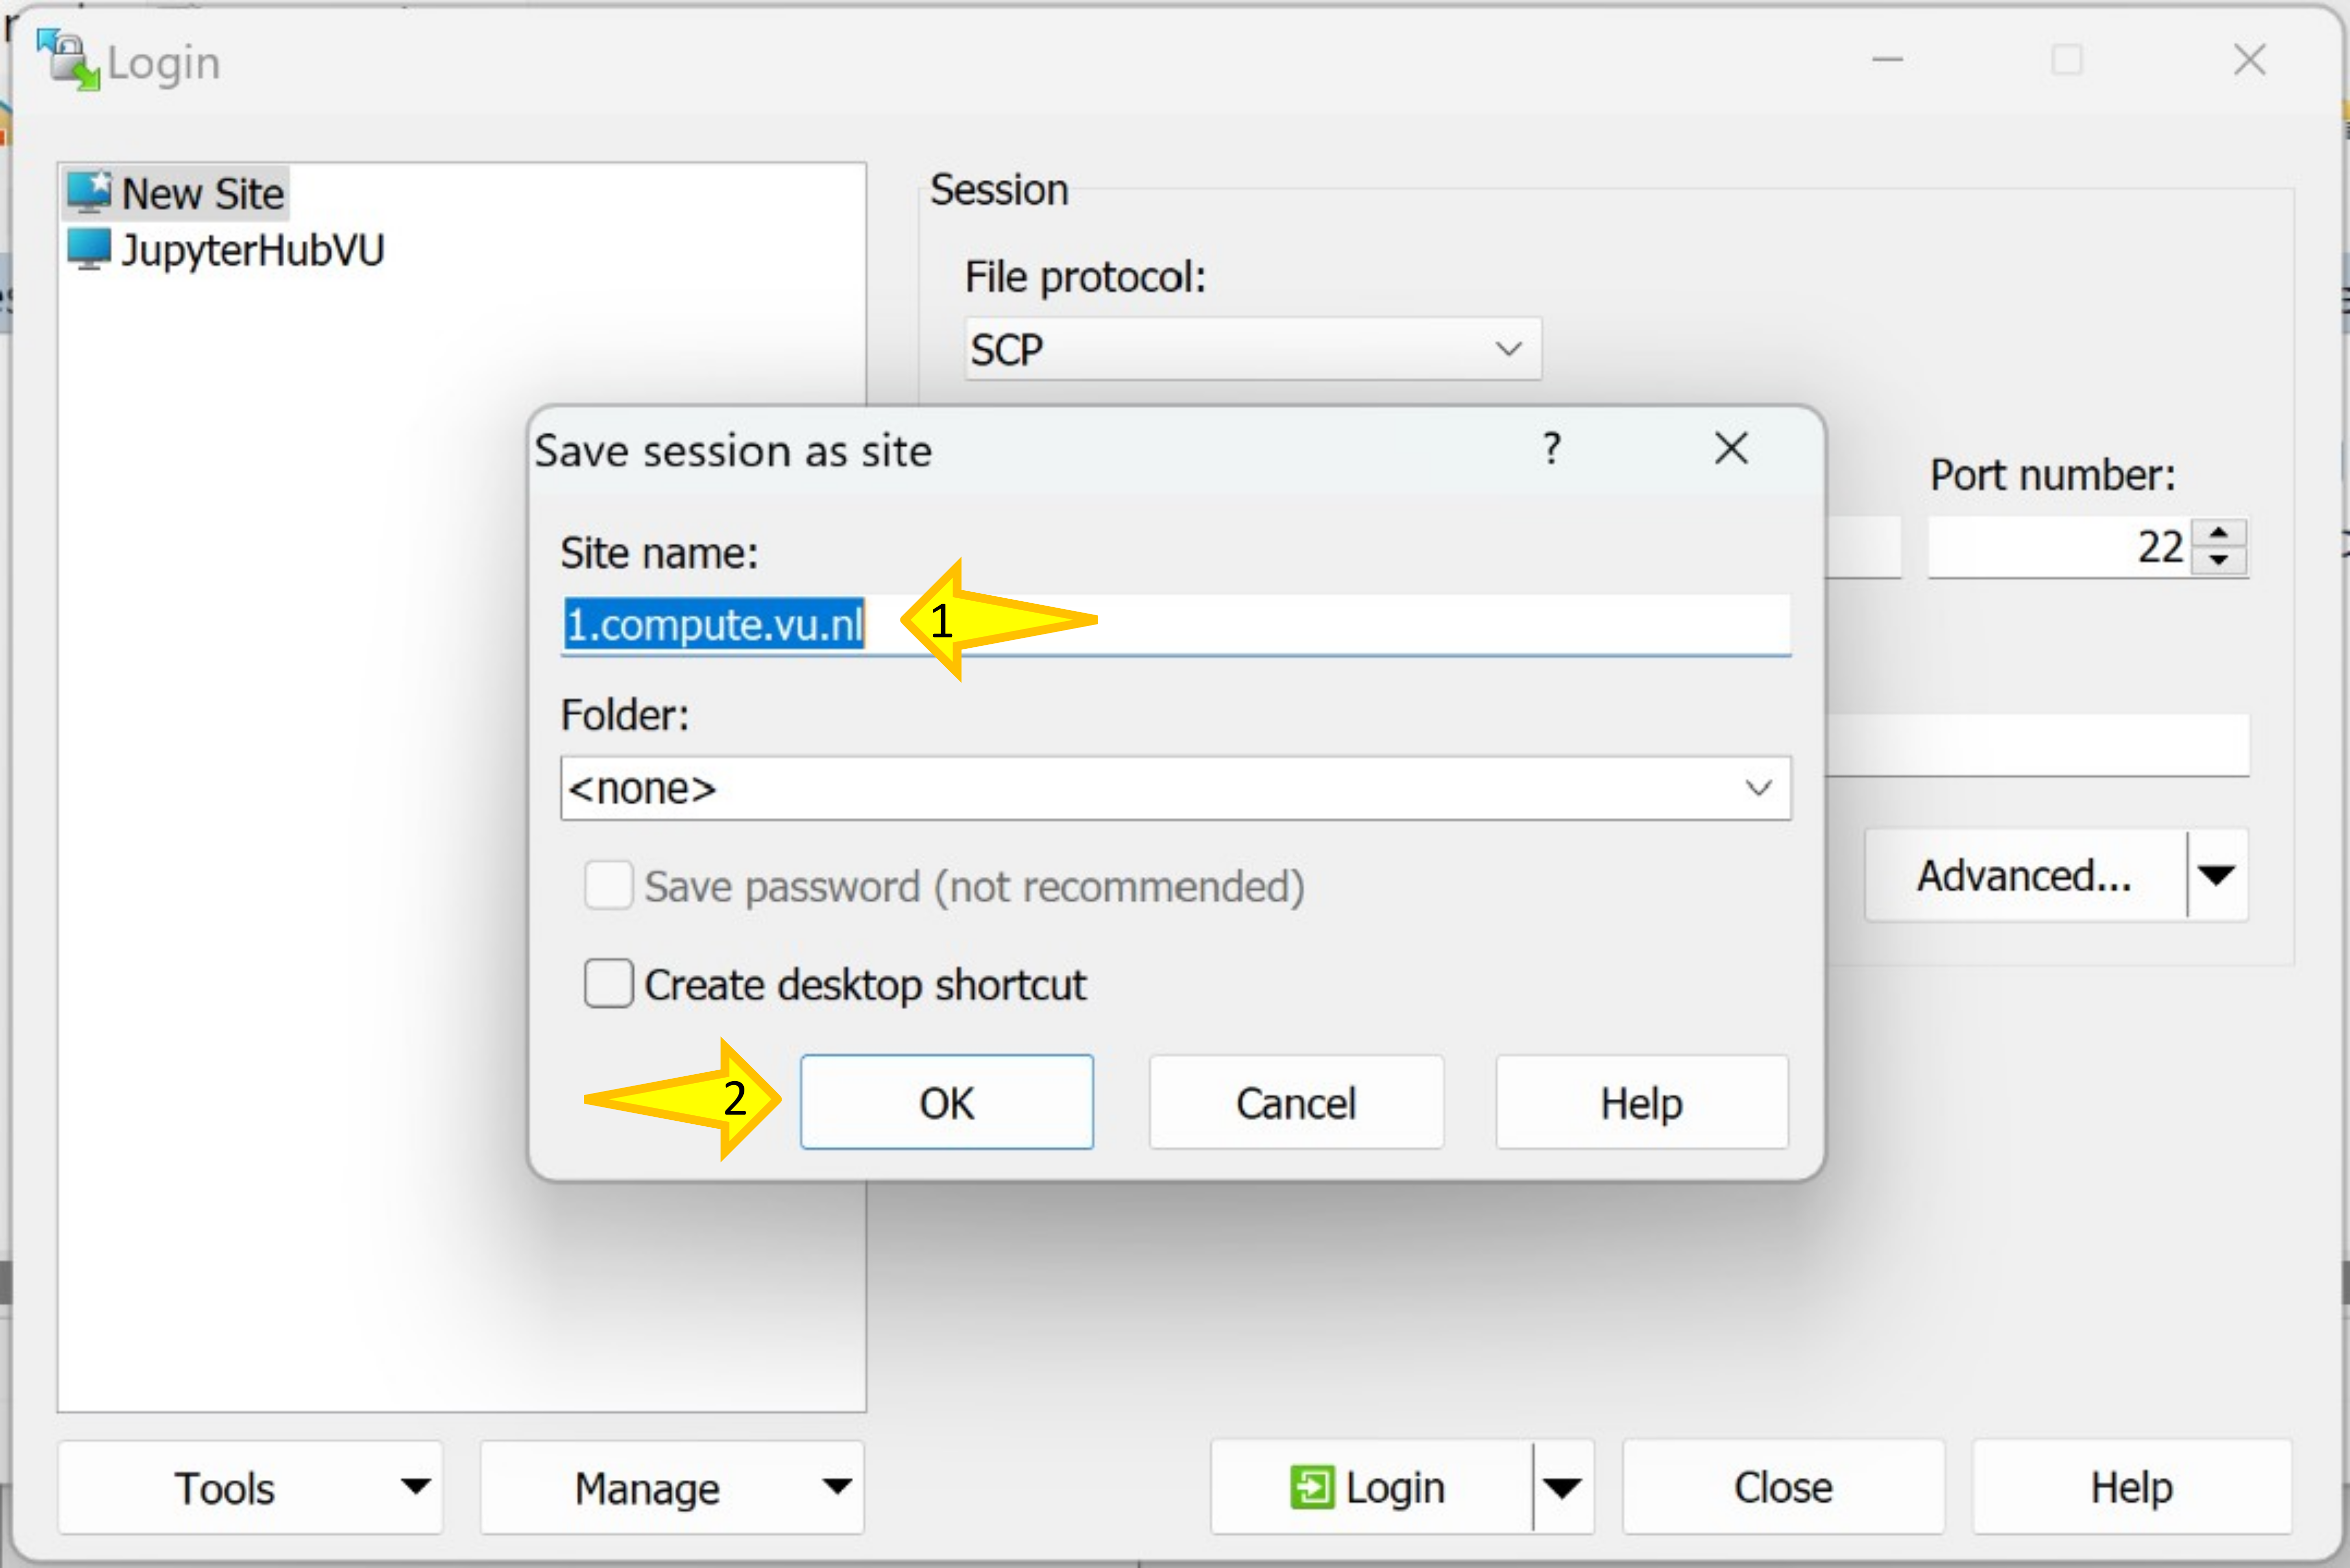
After you pressed “Save”, a new window will pop up. There, you can change the name of the site or leave it as it is. Press “OK” when you are done.
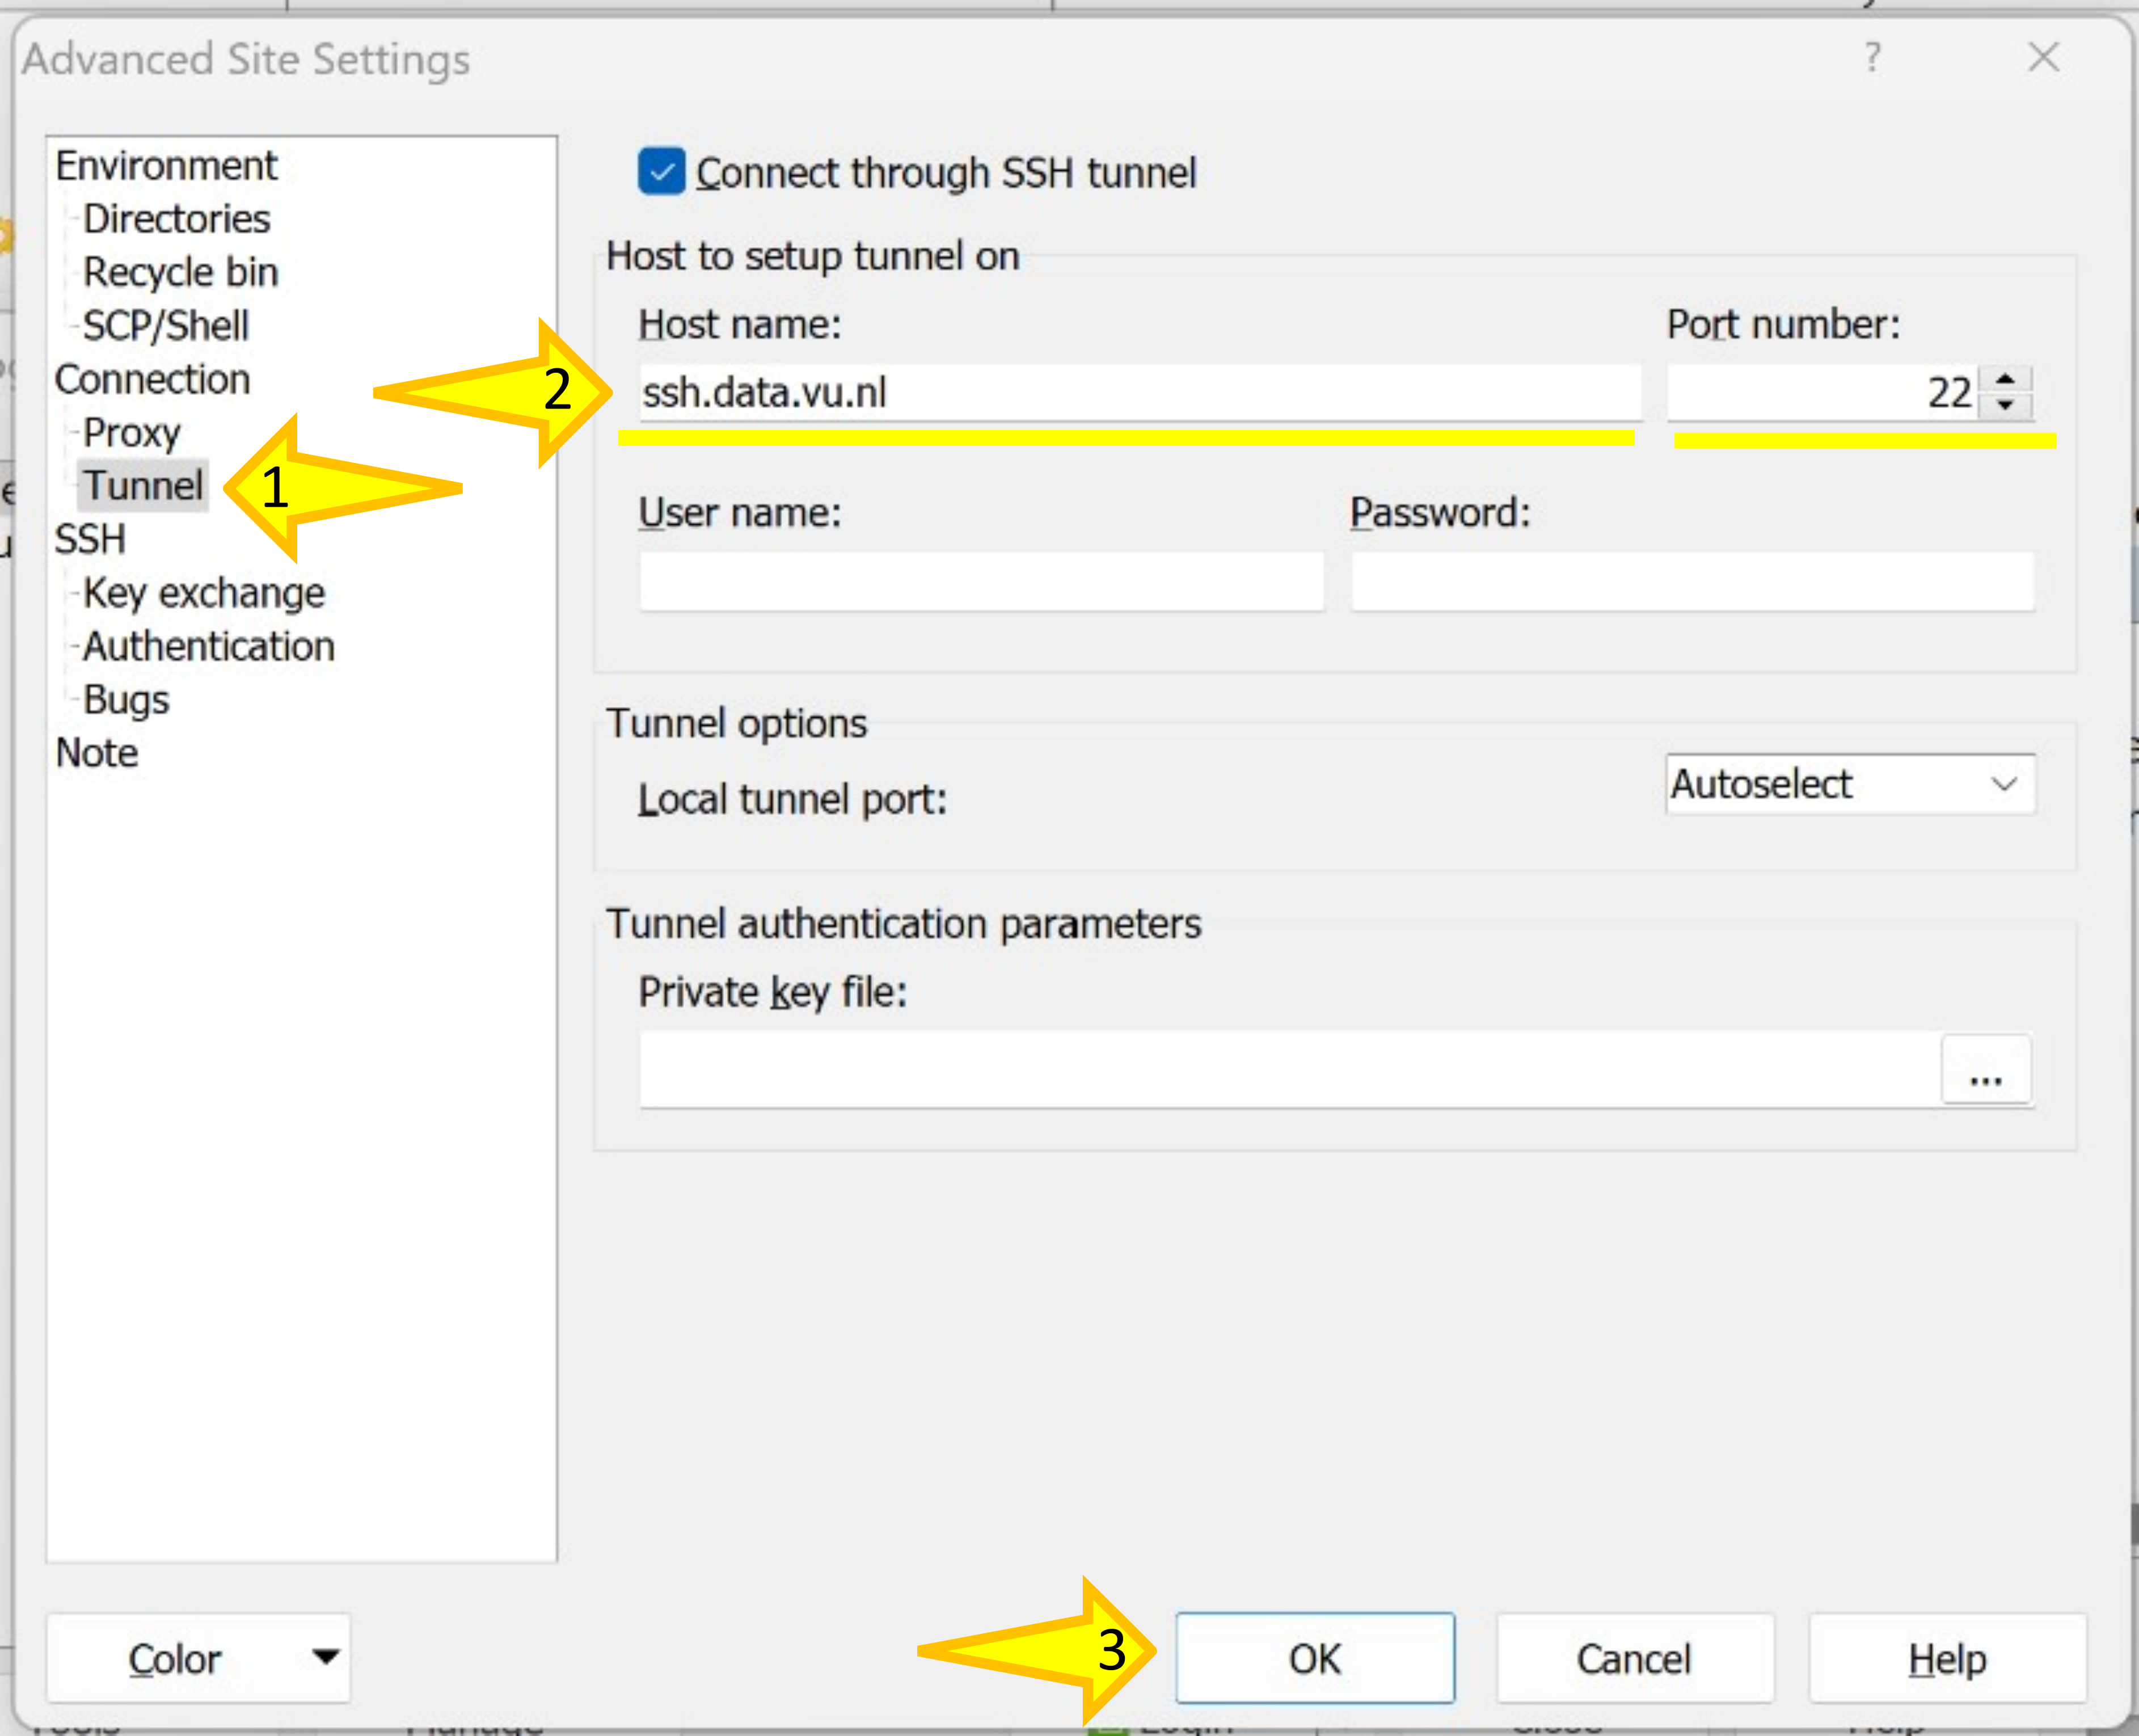
IMPORTANT: If you are working outside VU, then, you need to proxy your connection through the ssh.data.vu.nl stepstone server. For this, in the “Login” window, press the button “Advanced…” and add the information.
Now that the site is saved, you can connect just by clicking on “New Tab”
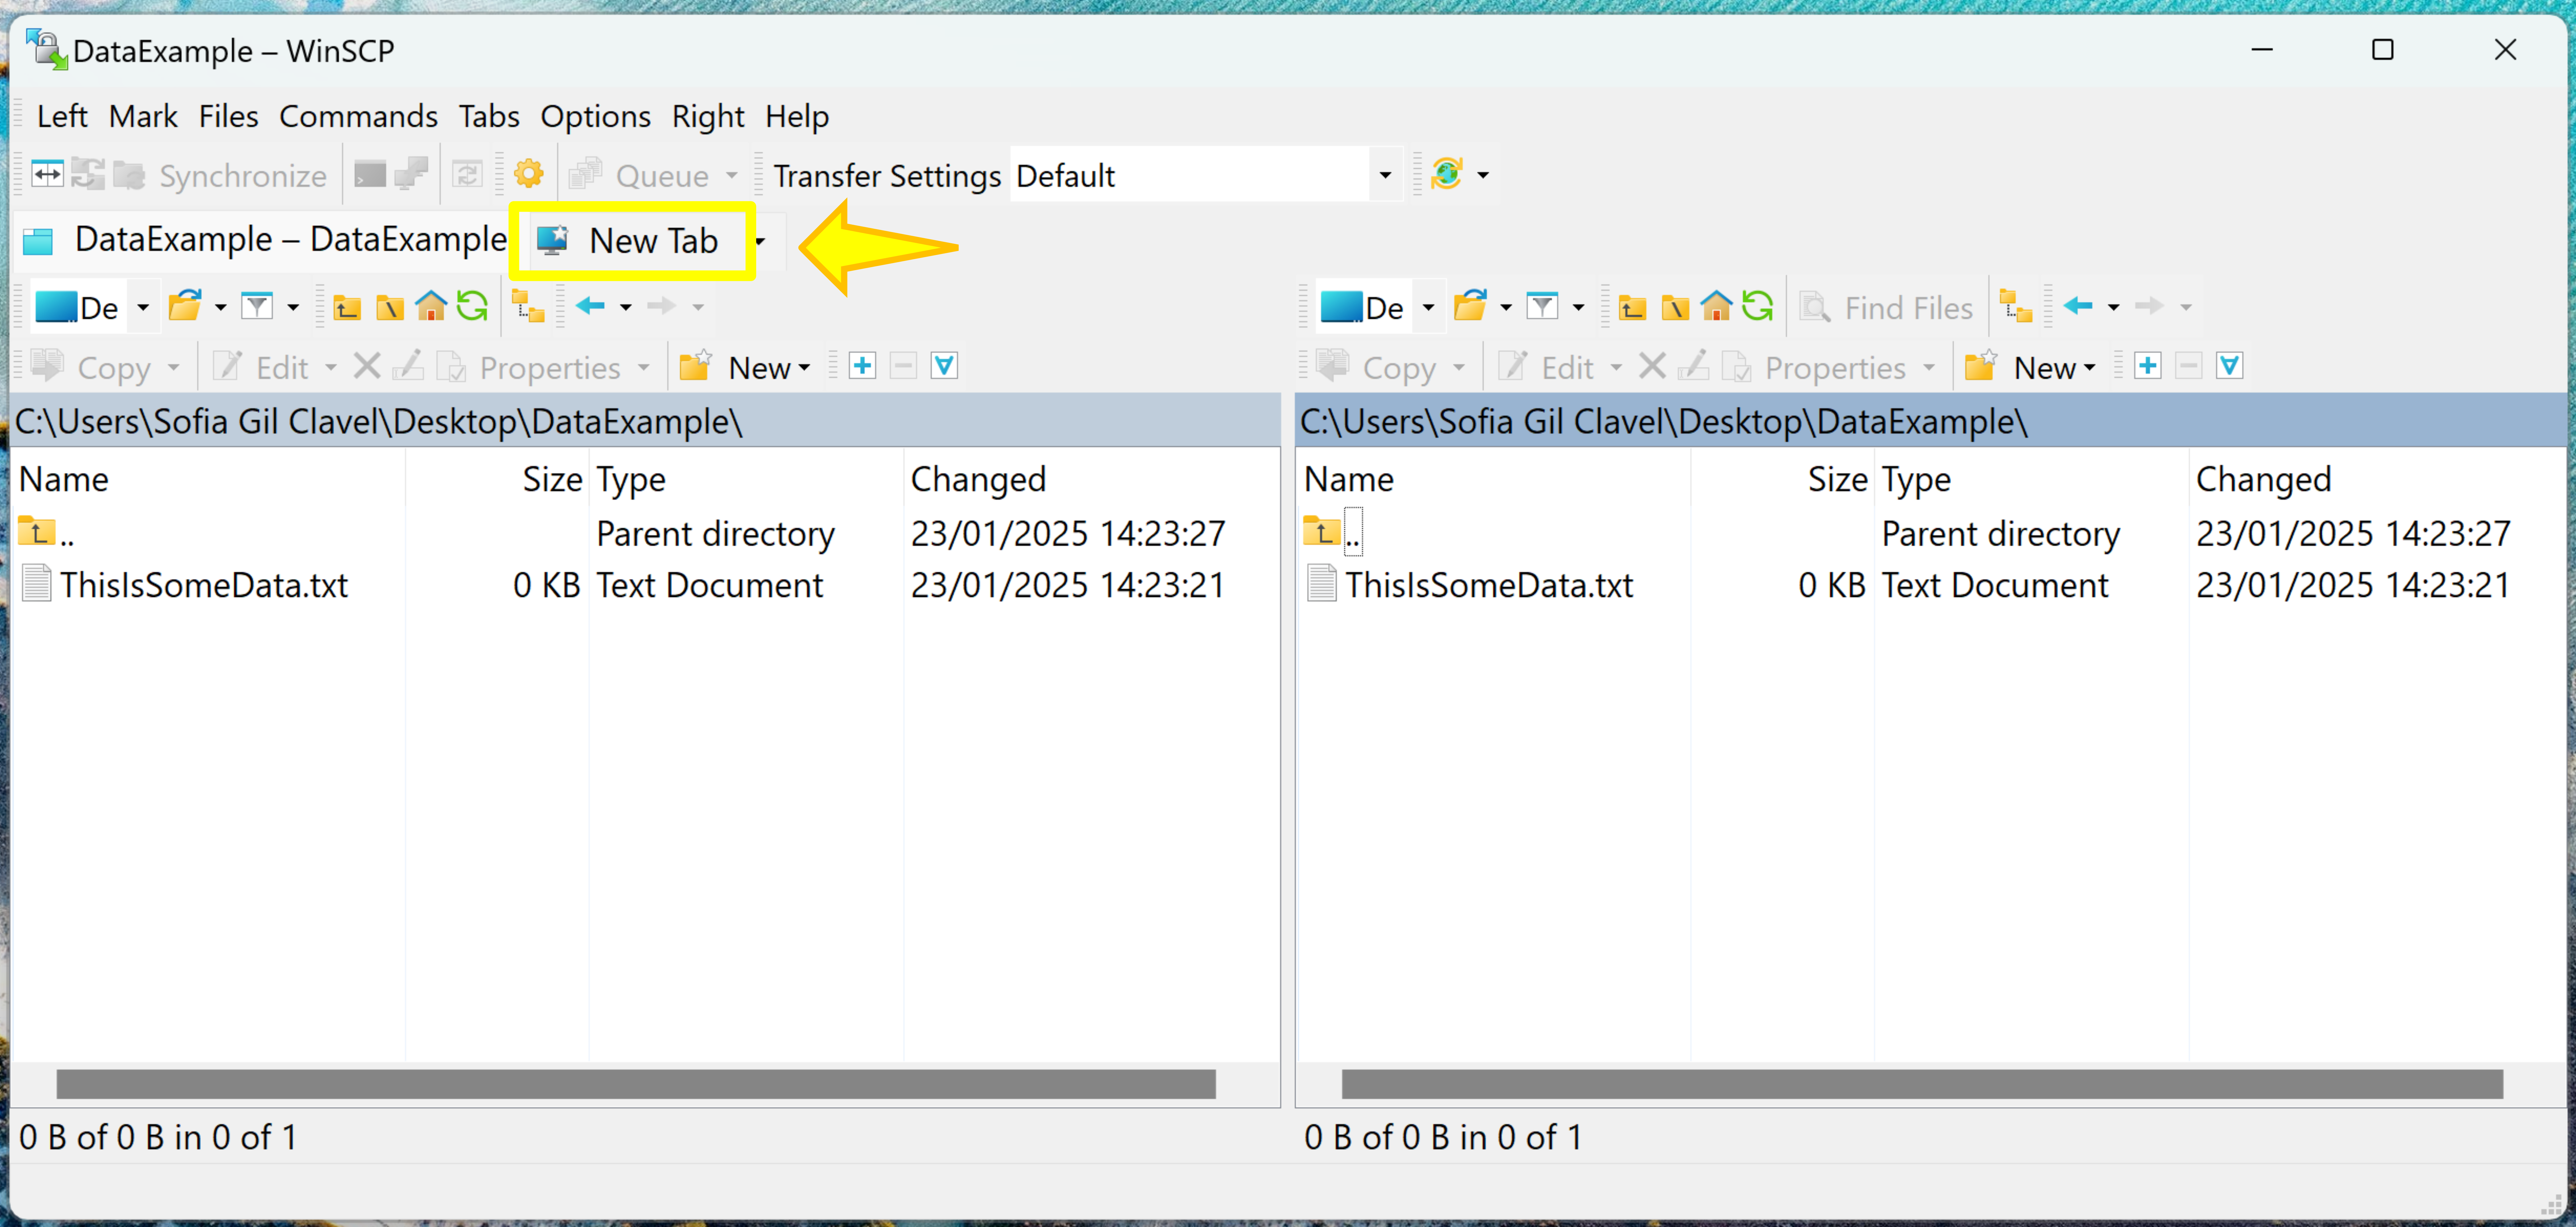
This will open the “Login” window. There you can choose the site you want to connect to and then “Login”.
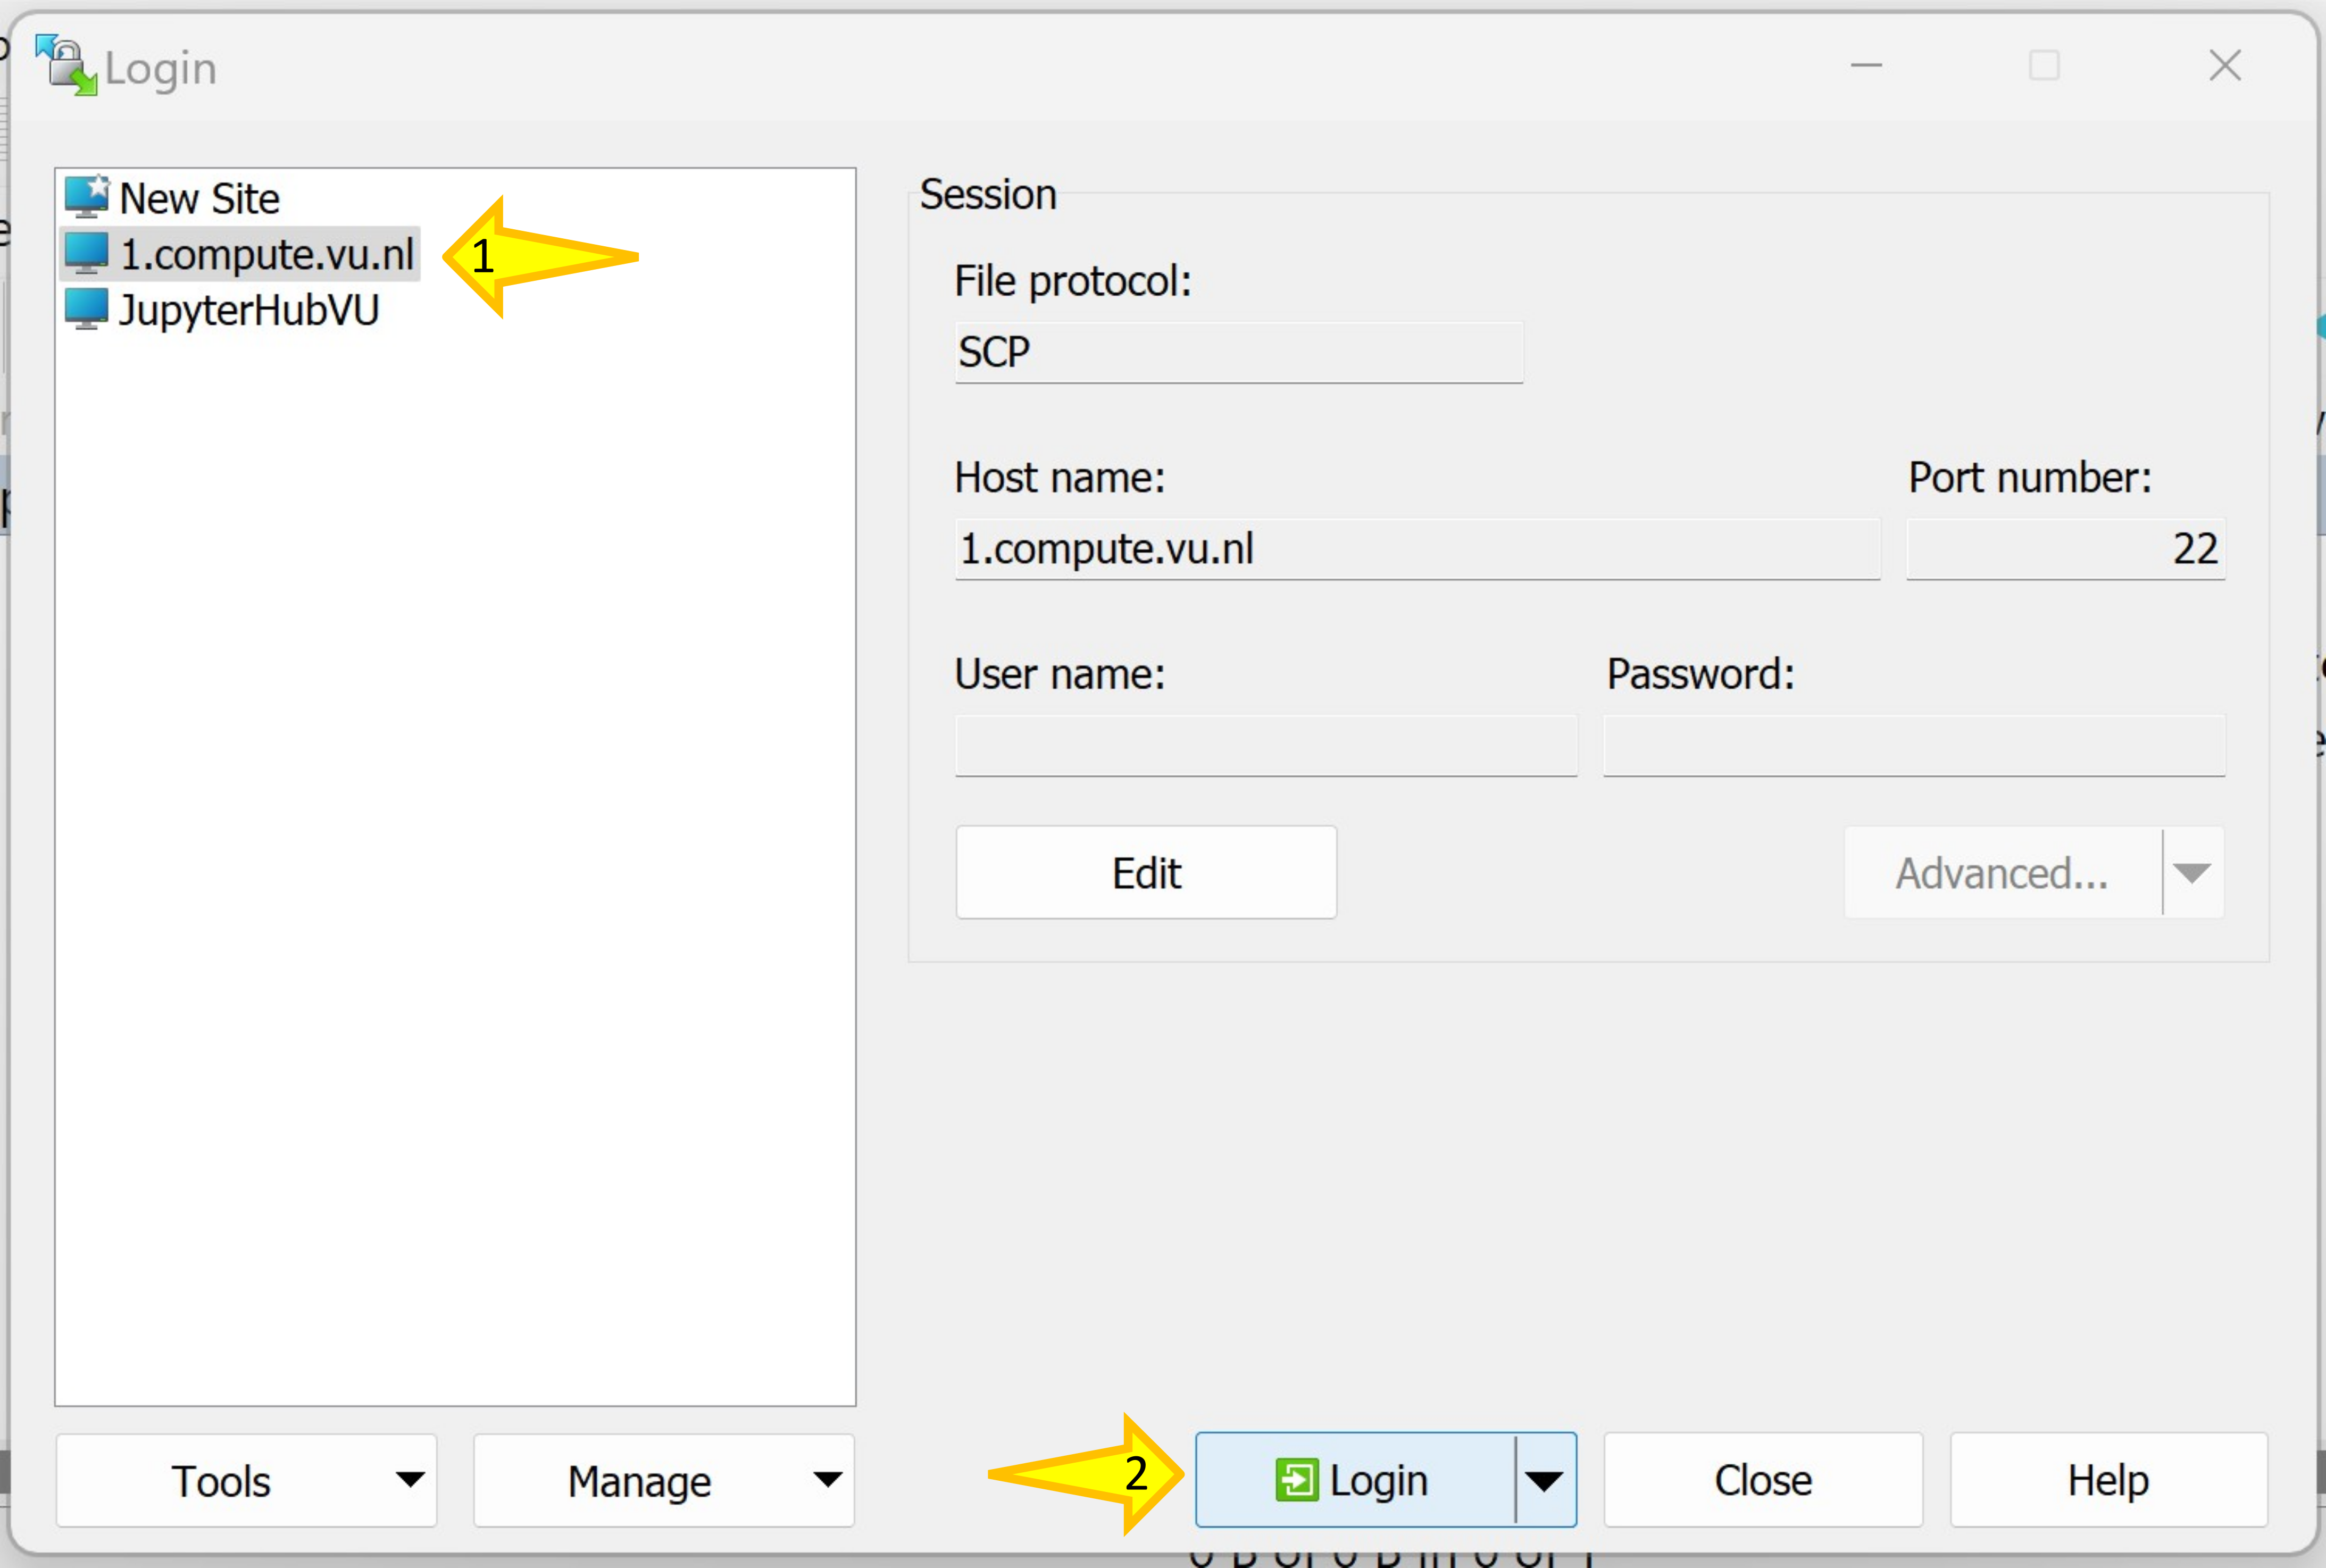
After pressing “Login” two new windows will appear sequentially. There you must add your Username and Password.

(ii) Upload the files
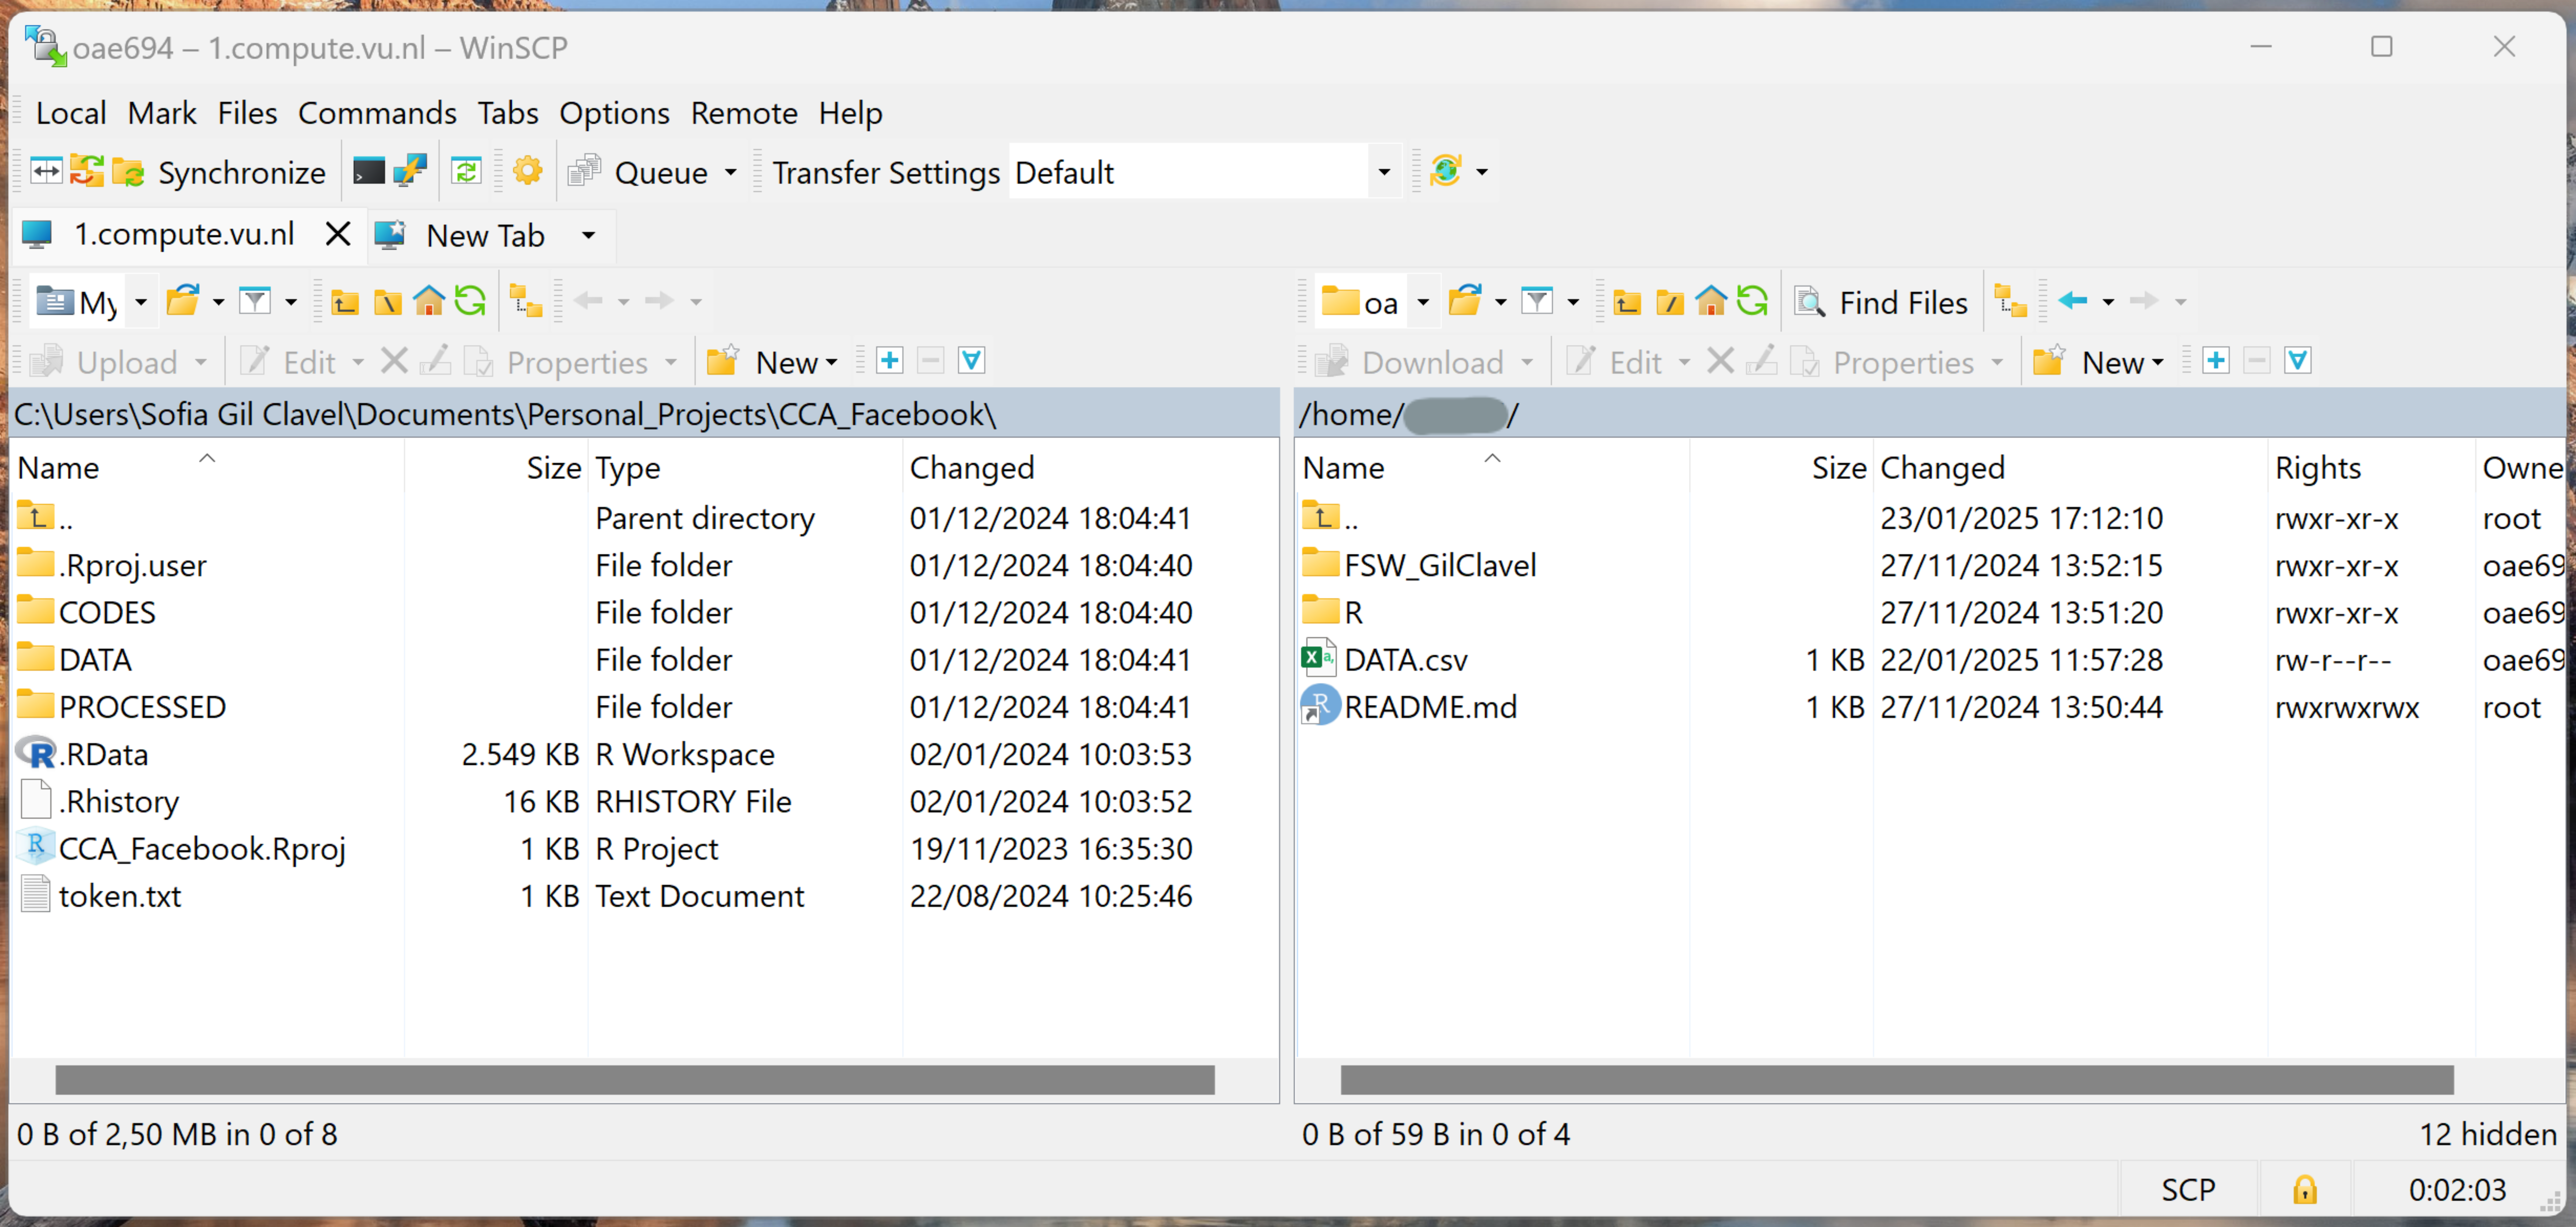
Once you logged in using your credentials, you will see a window with the files stored in your computer (left) and the server (right).
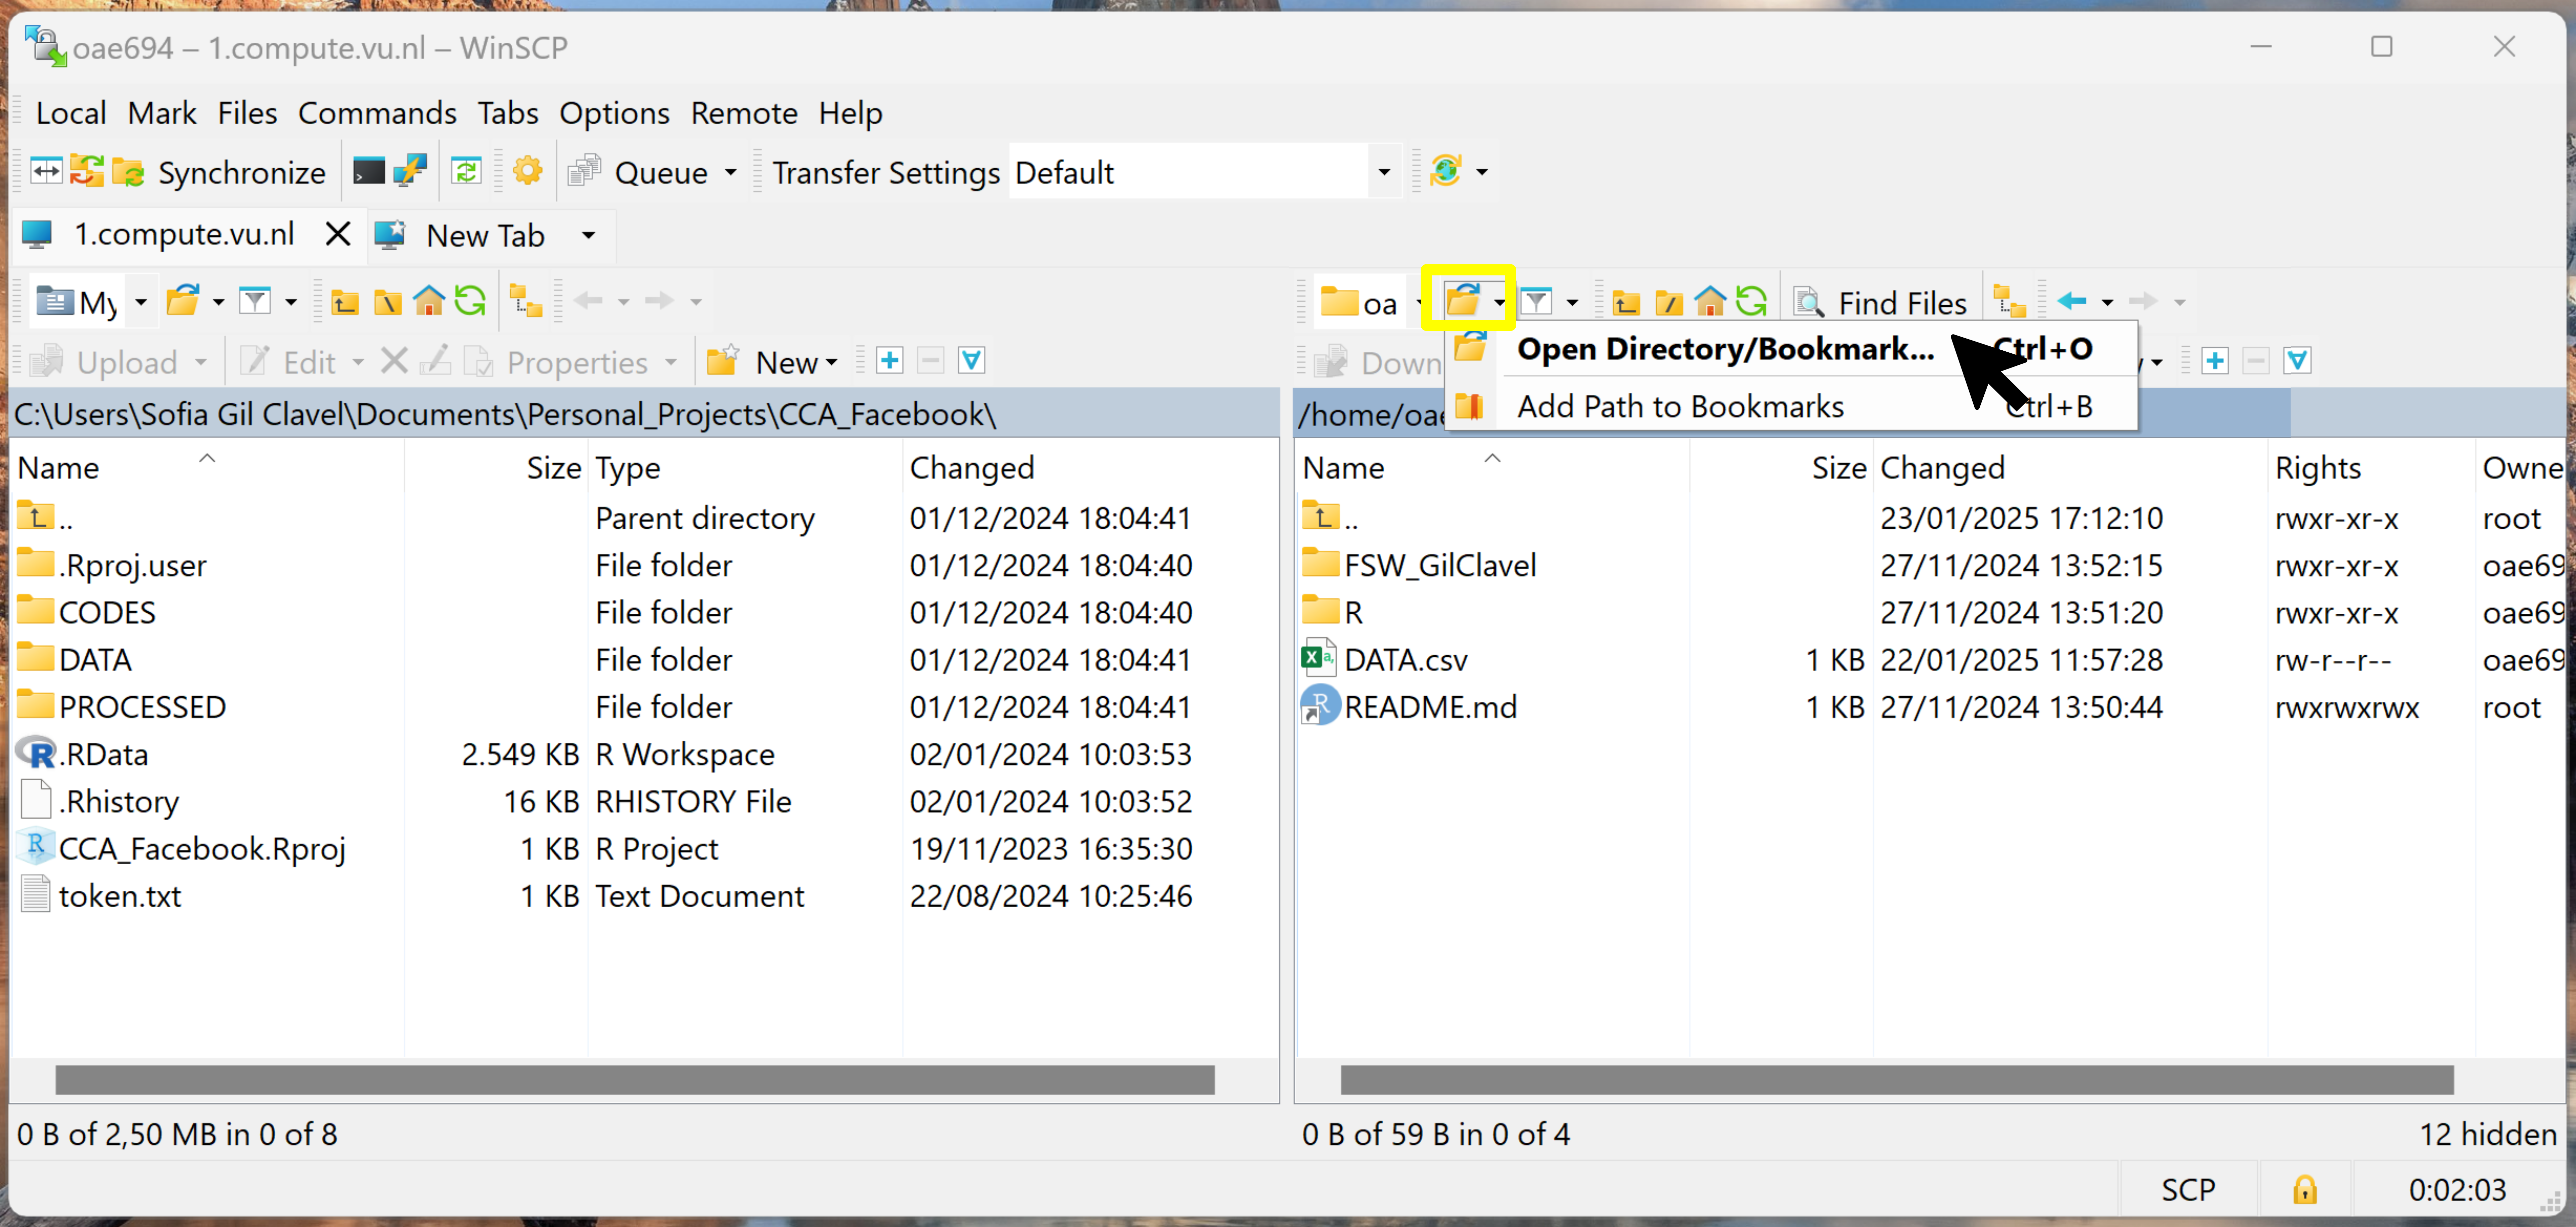
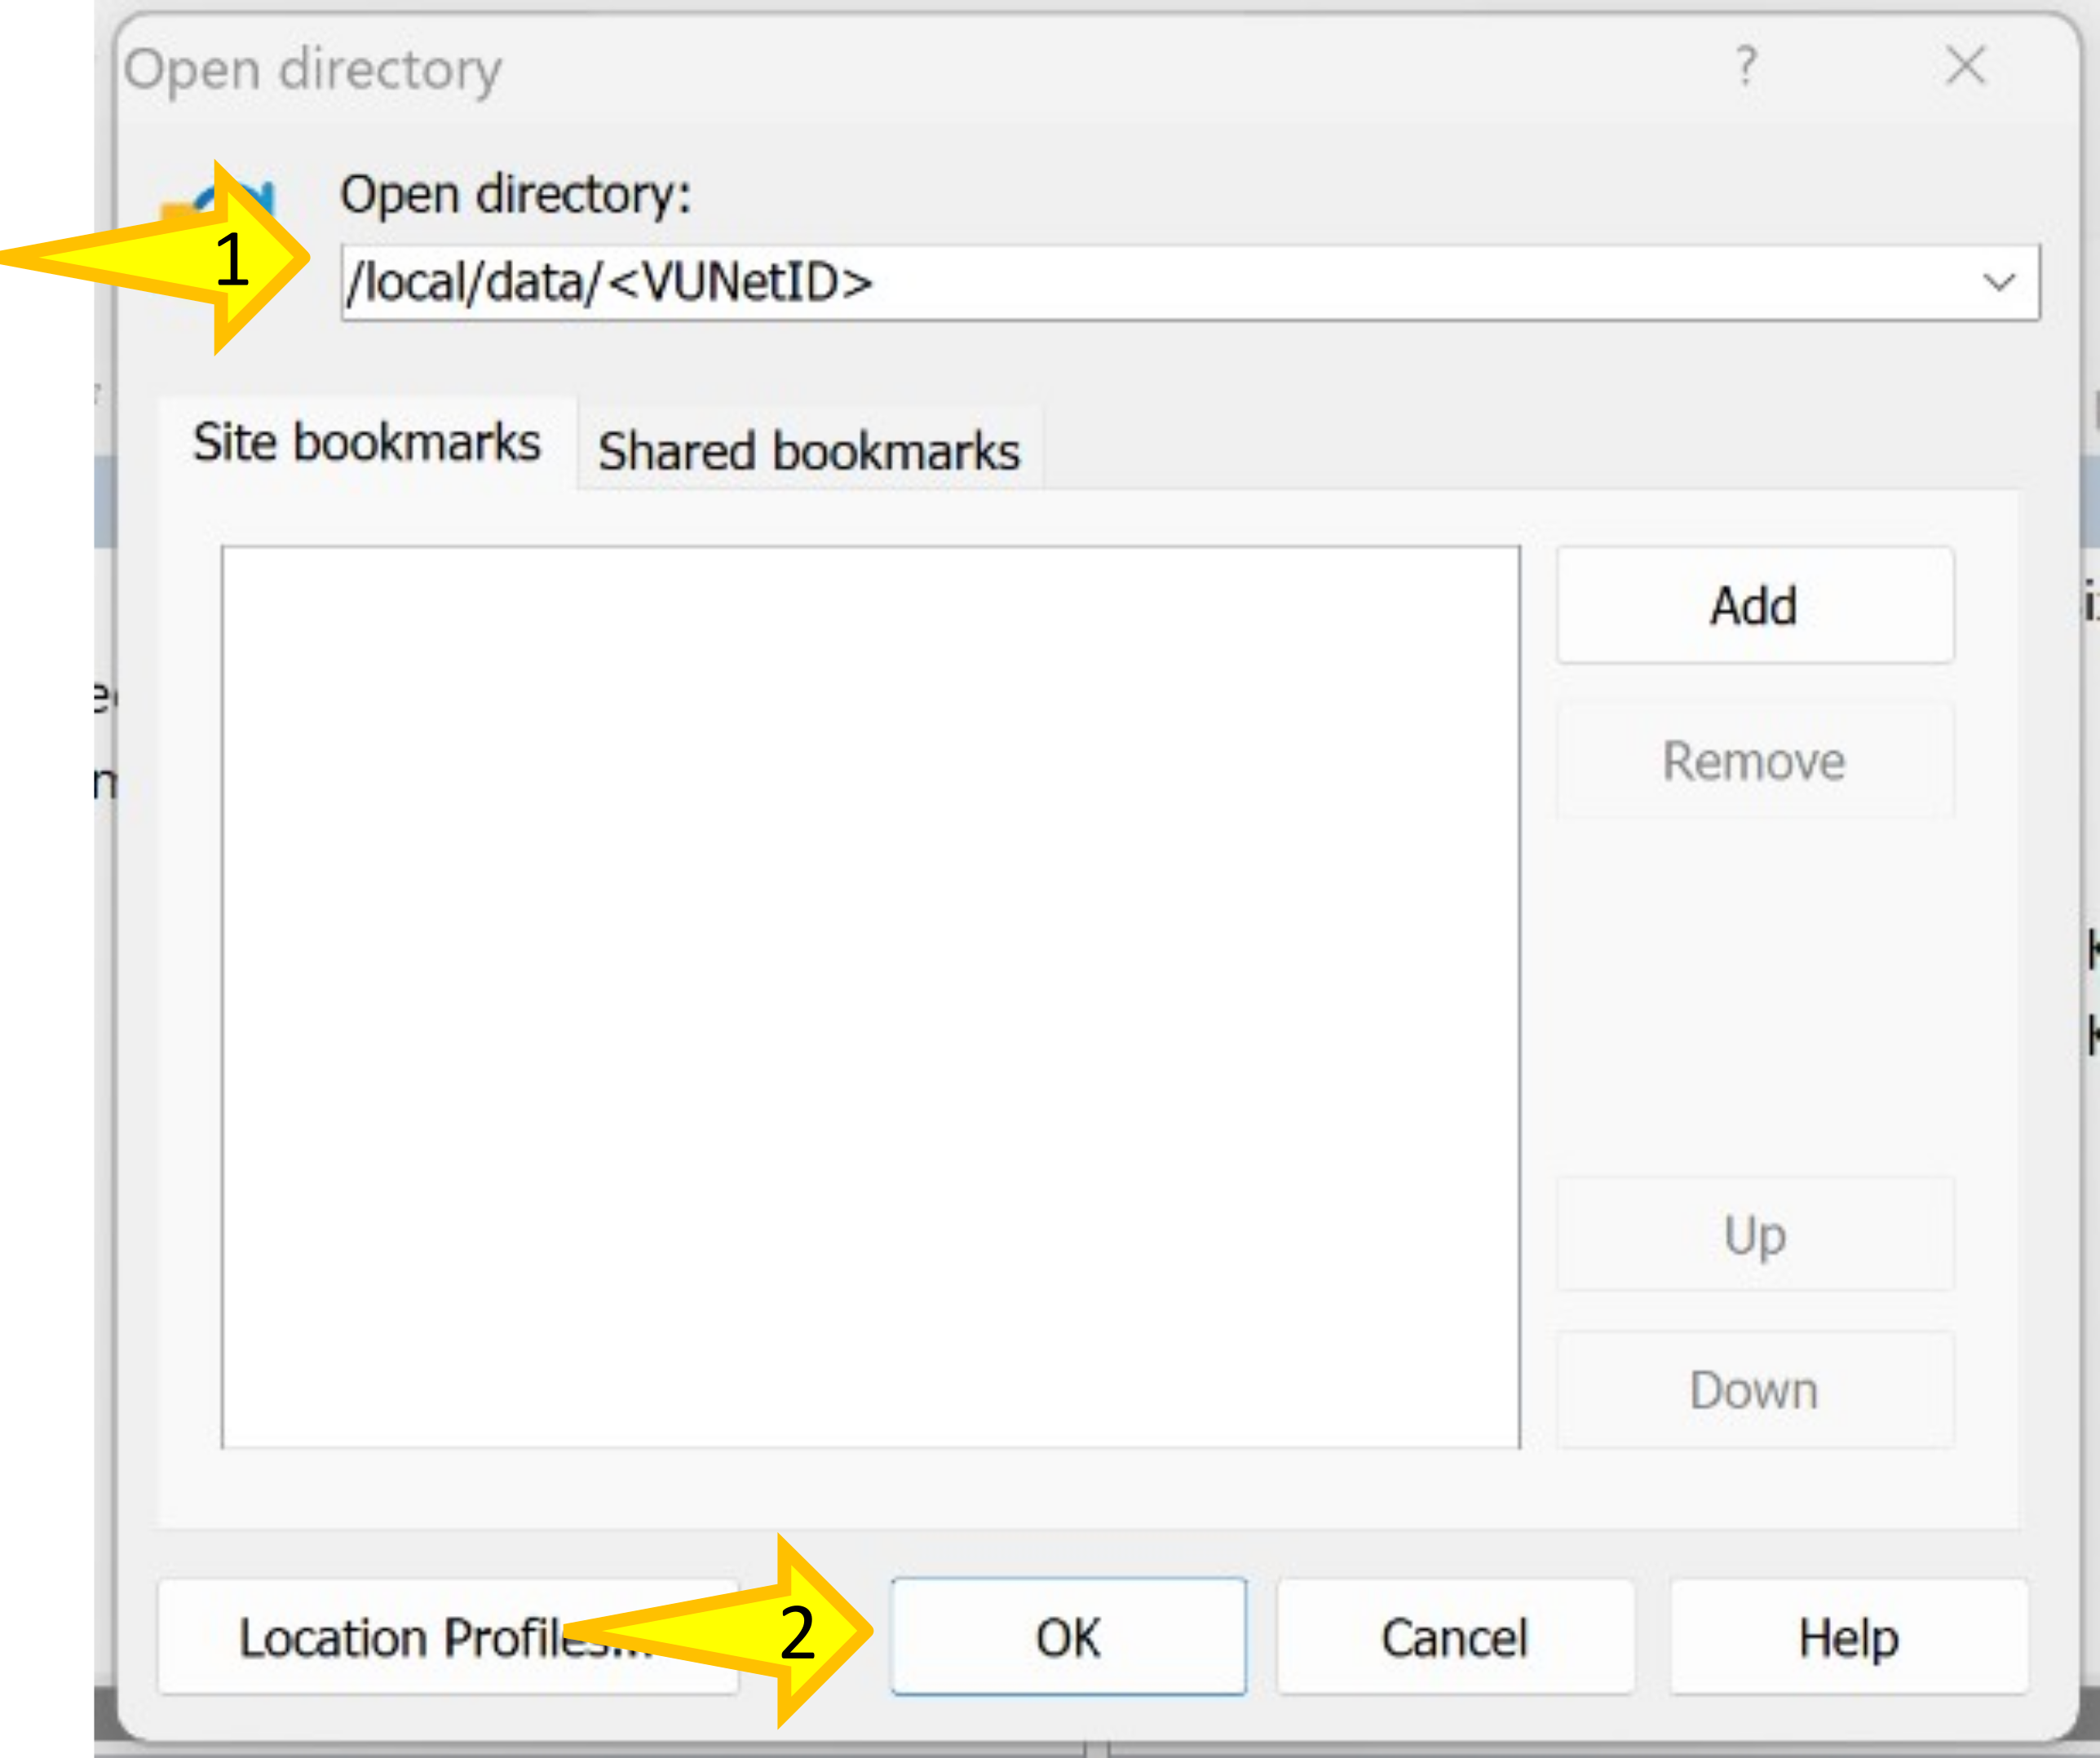
To change the server directory to the data folder, you need to click on “Open Directory/ Bookmark…”
There, change the directory to /local/data/<VUNetID> and press “OK”.
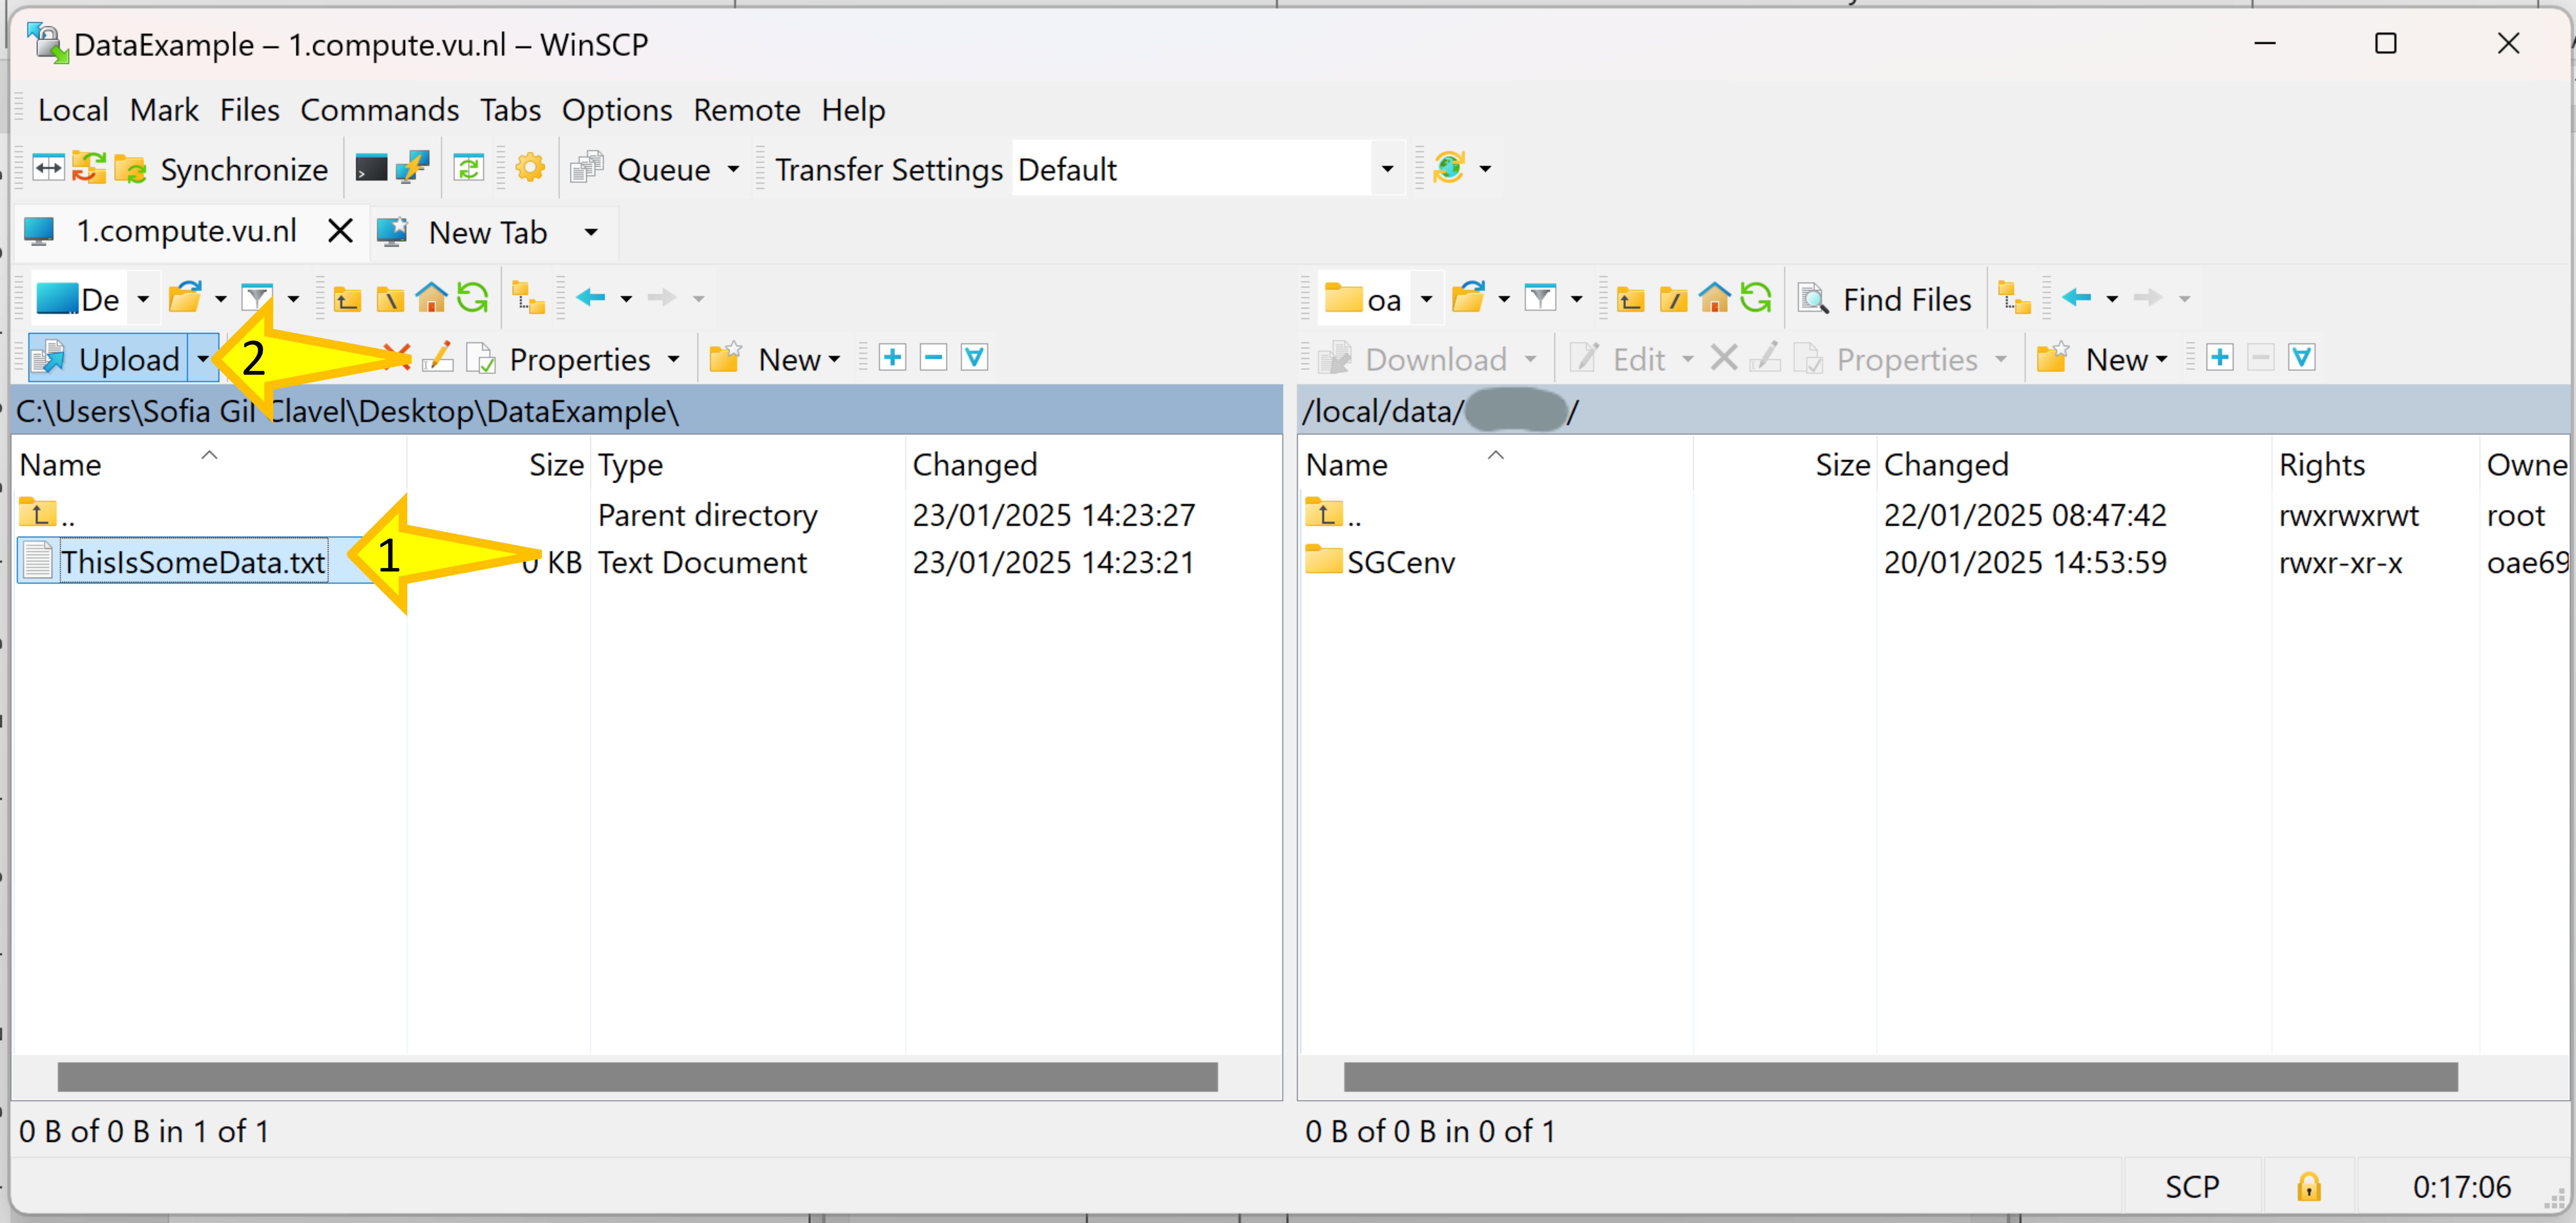
Now, you just need to select the data/files you want to upload and press “Upload”.
The “Upload” window will pup op. There you can confirm the directory where the data/files will be uploaded. Press “OK” if everything is correct.

That is all! Now your data is also in the JupyerHub server!
c Make sure that there is enough space
Before uploading your data to the servers, you need to make sure you
have enough space. For this, you just need to open the Terminal (Figure
4) and type df -h /local/data. This command will show you how much
space is available, then you can judge whether this is more than the
size of your dataset (Figure 9). Remember that this space is shared with
others. So, if you are not using the data anymore, then delete it.

Figure 9: Example of values returned by the command df -h /local/data.
d Every first day of the month, the directories are moved to local-old
Finally, according to IT (Figure 6):
“Every first day of the month, the directories are moved to /local/.old/. If your data is missing, check this directory first and move your relevant files back. You are responsible of keeping your data backed up.”
This translates into using a command in the Terminal to move your files
back to “/local/data/
mv <NAME OF YOUR DATA> /local/.old/ /local/data/<VUNetID>
High Performance Computer
[Coming soon]
Lack of GPUs
A GPU (Graphics Processing Unit) is a specialized electronic component initially developed to accelerate image and video rendering. Given their extraordinary ability to perform large-scale calculations, GPUs are now used in various fields. As such, they are used in artificial intelligence and scientific computing, where they are particularly effective at managing data-heavy and computationally intensive tasks. GPUs can handle a wider range of algorithms and operations, making them highly versatile for researchers and developers working on different AI applications, including deep learning. You can find more info about the role of GPUs in AI here. So, if you need to train some AI models or just speed up some scientific computing, then you will need to use GPUs. As VU employee, you have access to the High Performance Computer, and as Societal Analytics Lab member, you have access to our own specialized computing server.
JupyterHub
Since May 2025, JupyterHub also allows to run code using their GPUs!
To use them, you just need to access JupyterHub and from there you can use python. We recomend to set-up a conda environment, that way you would not mess up with other people’s python configuration.
To do so, the JupyterHub team offers some guide in their manuals. You can access
them by typing man vu-compute in the terminal.
High Performance Computer
If you need GPUs, then you can use the VU High Performance Computer managed by BAZIS. However, to use this computing server you need to know how to use the terminal and how to schedule your tasks using SSH files. If this is not the case, then you can contact us analytics-lab.fsw@vu.nl, we can help you. In terms of computing power, the High Performance Computer has 7 GPU nodes with 240GB RAM memory and 32 cores for general use. As VU employee, you can request access to the High Performance Computer here.
Computing server of the Societal Analytics Lab
[Coming soon]


